
1.General Information
1.1.Usage Guidelines for Colgate Domains
Overview
Domains @ Colgate provides managed web hosting services for scholarly and academic use. This service, is intended to address both practical needs for the coordinated hosting of web domains for a more reliable and consistent user experience, as well as support innovative approaches to teaching, learning, scholarship and creative work. Within each domain, a user can install applications to support a range of publishing options and development of curricular projects. Some key use cases include the following:
- assist faculty in understanding the wide range of web-based applications they can install and use to support teaching and learning.
- offer the resources and support for creating dynamic spaces on the web for teaching (course sites), research (lab sites), new forms of scholarly publication (digital /multimedia formats), and collaboration (inter-institutional).
- partnering with faculty members to encourage and support their experimentation and creativity for using the web in academically interesting ways.
- foster a sense of digital imagination that can inform future research, teaching and course development efforts.
- partner with faculty members who want to engage their students in curricular opportunities to use the web in academically meaningful ways. Connection and reflection are key elements of learning, and students can be supported to connect their learning in unique ways across course-based projects that showcase their interests and learning experiences on the web.
Availability & Use
Requests for access to use Domains @ Colgate is limited to current Colgate faculty members for teaching and research related purposes. Approval for student use is limited to direct curricular application (coursework, undergraduate research, faculty directed work, etc.), and requires the support of a faculty member, who is considered the data owner for the domain. Use of the domains service is governed by Colgate’s Acceptable Use Policy (http://www.colgate.edu/offices-and-services/information-technology/privacy-and-security/acceptable-use-policy).
Request & Approval
When a user browses to http://colgate.domains and fills out the Request Form, the form is sent to the ITS service desk and directly routed to the staff who administer Colgate Domains. Members of the Colgate Domains queue are composed of Services and Shared Infrastructure and Learning and Applied Innovation team members. Upon review of the request, the ITS team member will verify that the user is a current Colgate faculty member by using the Colgate directory. When a new site is created, their new domain is named, http://username.colgate.domains. For instances where faculty members want students to have their own domains (for academic / research purposes), faculty members can follow a similar process as above and provide the names of student users for account creation.
Managing Domains
Twice a year, prior to the start of each academic term, the Services and Shared Infrastructure team will export a listing of domains. Since all the domains will begin with a Colgate username, it will be trivial to match those domains to current Colgate users. For the list of domains who do not match to a current Colgate user, ITS will create an archive on Google drive and remove the website from the Domains platform. When a faculty member leaves the university, they can request to take their website(s) with them and ITS will provide them a compressed file of their cpanel account. In instances where, there is a site with legacy content of institutional value that is not longer active, ITS will work with the University Archivist to explore ways to store and archive the site.
Currently, there is no service to scan for websites that are operating in a way that is inconsistent with the Policy on Acceptable Use of Electronic Resources. Any Colgate student, faculty, or staff can create a website using the Google Sites platform. Domains@Colgate would operate just like the monitoring of Google Sites. If any website is reported that is operating outside the Acceptable User of Electronic Resources, ITS will suspend the Domains@Colgate account.
1.2.Choosing your domain name
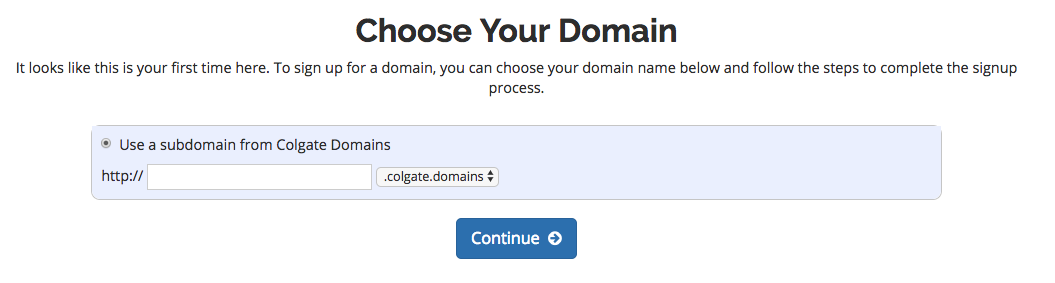
Establishing your domain name is the first step in getting started with staking your claim on the web. Your domain name is a unique Web address that can be used to build out your own digital presence. To create your domain, enter your Colgate username (typically first letter of first name, followed by last name).
1.3.Signing Up
Review the Guidelines for Use
Before you get started, we recommend that you review the Usage Guidelines for Domains at Colgate.
The Sign-Up Process
Once you’ve reviewed the guidelines, you can proceed to the sign-up page.
- Click the “Get Started” Button

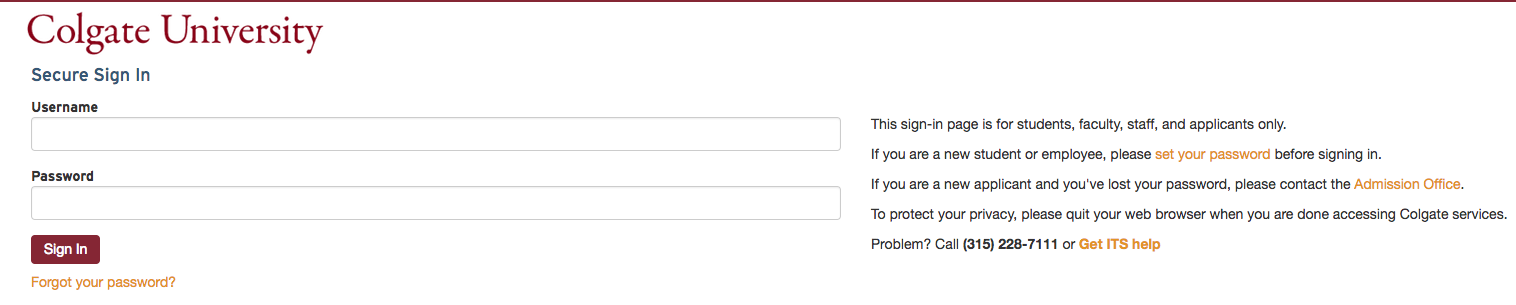
- You will be redirected to login for verification. You will use your Colgate username and password to log in.

Create Your Domain
- Enter your Colgate username. Click the button labeled Continue.

- Review your Domain name and contact information. It should be your first name, last name, and Colgate email. Click Sign Up.

After you click Sign Up, you will see a page letting you know that your domain is ready. You will then be redirected to the cPanel where you are on your way to creating your own Colgate Domains space.
1.4.Understanding Accounts & Passwords
One aspect of colgate.domains that users may find a bit complicated at first is understanding the different accounts (and associated passwords) that you can manage as part of your participation in the project. This article outlines the types of accounts that you are likely to have, what they are for, and how you go about resetting passwords on each of them.
Your cPanel Account
When you first sign-up for your domain and hosting, a cPanel account will be generated that provides you with access to your slice of the colgate.domains Web server. Your cPanel account is automatically associated with your Colgate username. Therefore, your Colgate user name will grant you access to your cPanel account.
Your Application Administrator Accounts
Every time you install a new application in cPanel, an Administrator Account for that application will be created. You will likely use these accounts very often – every time you need to login to your application to manage the associated Web site, you will use this account.
For example, if you install WordPress to manage your Web site, every time you need to add content to WordPress, change your theme, approve comments, etc. you will use this account to login.
Usually, you will be given the opportunity to choose the username and password for that account. We recommend choosing something that you are likely to remember but that is strong and secure.
Upon installation, you will likely receive an email confirming the user-id/password combination you chose. It will also have information about how to access the login page for that application. You may wish to make sure you don’t delete this message.
Depending on the application you’re working with, managing and resetting the password for this account will vary. If you’ve used Installatron (in cPanel) to install the application, however, you can always review the account credentials:
-
Login to cPanel through https://colgate.domains/dashboard/
-
Click the Installatron icon in the Software/Services section.
-
Find the application you installed under My Applications.
-
Click the Edit button (this looks like a blue wrench).
-
Scroll down to find the Administrator Username and Password.
In addition, most applications should have some kind of password reset link on the login page.
Other Types of Accounts
In addition to the three account types outlined above, there are a few other kinds of accounts you may have as part of colgate.domains:
-
FTP: If you set up FTP on your account, you will need to set up an account.
-
Application User Accounts: In addition to the Administrator Account that you set up when installing an application, most applications will also let you set up user accounts.
1.5.What Can You Do with Your Account?
Your ability to do things on Colgate Domains is dictated to a large degree by the limits of your imagination. That said, there are some technical requirements and limitations that you should be aware of and might want to review.
To spark your imagination, here are some ideas that might help you get started:
Install a Web Application in Your Space
Colgate Domains makes it very simple to install certain Web applications in your Web space. Web applications are just special software that run on a Web server. Usually they allow you to build and manage a Web site. The kind of site you can build depends on the type of application you install. Here are some examples of applications that you can easily install within the colgate.domains Web hosting interface:
 WordPress: WordPress is a blogging application. While it allows you to quickly and easily set up a blog, it also comes with a set of features that really make it possible to set up any kind of basic Web site without much difficulty. We have resources available that are focused on installing and using WordPress.
 Mediawiki: If you’ve ever browsed or edited Wikipedia, you’ve already used Mediawiki. It is the open-source wiki software that runs the online encyclopedia, and you can install it on your Web space. It’s a good choice if you’re interested in publishing documents and then collaborating with others on them. We have instructions for installing Mediawiki.
 ZenPhoto: This application is a good choice if you’re looking for a way to share images in your Web space. It’s also a quick install through Installatron in cPanel onto your Plymouth Create Web space.
These are just a FEW of the open-source applications that are available to you in your Colgate Domains Web space. We encourage you to read more about what Web applications are and which ones are available to you through this project.
Organize Your Site with Folders
Through this project, you’ve received a domain name that you can actually subdivide and organize anyway you like. One easy way to organize your domain is to create subfolders for your site (which can also have their own applications installed in them). Here’s an example of how you might organize your site (using the subdomain vs. the subfolder approach)
| Subdomain Approach | Subfolder Approach | |
| yourdomain.com (“root”) | Install WordPress as your “main site” | yourdomain.com (“root”) |
| course1.yourdomain.com | Install a second WordPress instance for a course you’re taking | yourdomain.com/course1 |
| photos.yourdomain.com | Install ZenPhoto for a public photo gallery of your photos | yourdomain.com/photos |
| docs.yourdomain.com | Install MediaWiki for a club you belong to that wants to collaboratively edit its bylaws | yourdomain.com/docs |
| files.yourdomain.com | Install OwnCloud so you can access your files on your laptop and at work | yourdomain.com/files |
This is just an EXAMPLE of a way to organize your site and then use different sections to do different things. There is no one solution to this challenge, and what you do should be driven by what makes sense to you. To start, you may just want to install one thing at the “root” of your domain, and then let the rest evolve as you get to know more about what’s possible.
Map Your Domain (or a Subdomain)
If you already have a digital presence that you’d like to pull into your Colgate Domains space, domain mapping is an option you may wish to explore. This allows you to assign your domain (or a subdomain) to another service. Some services that work with domain mapping are:
When you map a domain, users who visit your URL will automatically see your space on one of these services. It’s a great way to incorporate your activity elsewhere into your domain, and it might be a good first-step if you’ve already established a presence somewhere else and just want to point your new domain to that space.
1.6.Registering a Domain
Colgate Domains currently utilizes subdomains of .colgate.domains for the initial signup, however after using your space you may decide you’d like to register a top-level domain (a .com, .net, .org address). You can do this by registering a domain with a service provider (we make a recommendation below, but any domain provider should work) and adding it to your space as an Addon Domain.
To start you’ll need to get the domain registered. When choosing a domain we recommend keeping it all lower-case, avoiding hyphens, keeping it short, and of course it will need to be a unique address. Reclaim Hosting has made the process of registering a domain quite simple, and the domain will work with very few additional steps due to the integration they have with our hosting system. To register a domain you would go to https://portal.reclaimhosting.com/cart.php?a=add&domain=register and type in the domain you’d like to purchase:

After ensuring the domain is available for purchase you’ll be prompted to select whether you’d like to protect the contact information associated with the domain. All domain registrations are required to have valid contact information publicly available, however, a proxy service to protect your identity is available for an additional fee. You can read more about this service, ID Protect, at http://docs.reclaimhosting.com/FAQ/ID-Protect-FAQ/.
You’ll also be prompted for nameservers for the domain. If registering the domain through Reclaim Hosting you can leave these with the default. If registering the domain elsewhere you’ll want to point the nameservers to ns1.reclaimhosting.com and ns2.reclaimhosting.com in order for the domain to work with our system.
Once you’ve completed the checkout process with payment information the domain will be registered automatically. The last step is to add it to your existing account here at Colgate Domains. To do that you’ll log into your account at https://colgate.domains/dashboard and in cPanel navigate to Domains > Add-on Domains.

Here you will type in the domain that you registered previously to host it within your space on Colgate Domains. cPanel will also setup a subdomain which you can leave with the default that it creates and verify a location for the files for the domain (typically a folder inside of public_html). The option to create an additional FTP account is present but not necessary. Once the domain is entered click Add Domain to add the domain to your hosting account.

At this point the domain will now be hosted in your account and you can use it to install software, upload files, and any number of other actions available to you in cPanel.
1.7.What Exactly is a Web Application?
In the most general terms, a Web application is a piece of software that runs on a Web server. A Web server is a just a specialized computer designed to host Web pages.
Most Web applications are comprised of two components: files and a database. When you install a Web application, you will need to make sure all of the files are copied over into the appropriate location AND that a database (and database user) has been set up to connect to those files. Often, you will have to do some configuration to make sure the application knows how to access the database.
The system we use for Colgate Domains uses a special script installer called Installatron (in cPanel) that allows you to automatically install dozens of open source applications. When you use Installatron, you don’t need to worry about moving files, creating databases, or doing the initial configuration. It’s all taken care of for you. You can find out more about Installatron here.
In order to run on the Colgate Domains server, Web applications must be able to run on a LAMP server, which is the particular kind of Web server that we use. Occasionally, a Web application may require additional components or modules that need to be installed on the server.
1.8.Static and Dynamic Websites
Static Websites
In the early days of the Web, almost all Web sites were what is known as 'static sites.' Content (text, images, video, audio, etc), was placed or embedded in a file in which HTML tags were used to format it. If you looked at the actual contents of the file, you might see something like this:

The content and the tags lived side-by-side. To edit the page, you’d open up the file (on your own computer) in a program capable of editing HTML files and make changes to either the content or the presentation. Every page had to be edited individually, even if the edits you were making were for common elements that appeared on many pages (like menu bars).
From a technical perspective, accessing a static Web site is fairly straightforward. When your computer is connected to the Internet, you can use a Web browser to access files on a Web server (as long as you know the address). The Web server delivers the contents of those files to your browser, and your browser displays them.
Dynamic Websites
Over time, as the Web became more sophisticated, new systems emerged for creating and managing Web sites. These moved beyond the model of having content and HTML tags live in a simple HTML page which your browser accessed and displayed. Instead, these systems were Web applications – software that literally runs on the Web server and makes it possible to manage a Web site, often with very sophisticated features. One feature of these applications is that they separate content and presentation by storing most content (your text, images, etc) and data about the site (the title, options, etc). in a database.
On the Web server, the Web application installs files that are written in some kind of programming language. The server reads this code and obeys any requests in it to access data in the database (which lives on a separate server) and displays it according to the instructions in the code.

Essentially, the data for the site (living in a series of tables in a database on the database server) is entirely separate from the actual presentation of the site (living in the code of the programmed files on the Web server). Special software on both the Web server and the Database server enable the two to speak to each other and work together.
One of the benefits of using a Web application is that you usually don’t need to touch (or even look at!) the code in order to make changes to your content. In addition, editing the site usually involves accessing some kind of control panel through your Web browser and filling out a form, instead of having to download and access files in software on your own computer.
Dynamic vs Static Content
Sometimes when we talk about the difference between dynamic and static content we get bogged down in the idea of whether or not the content is “fresh” (dynamic, regularly updated) or “old” (static, never updated). How frequently you update your content has nothing to do with what kind of system you are using to manage your site. You can manage a static Web site (as described above) and update the content every day. You can also have a dynamic Web site (running something like WordPress) and never change the content after you create it.
Generally speaking, it IS easier to regularly update content on a dynamic Web site because the Web application just makes it easier. Sometimes, even when you just want a very basic page or placeholder, it’s easier to install a Web application (and only put up a single page) then to manually create an HTML page and upload it.
A Side Note about Separating Content from Presentation: Style Sheets
Another aspect of separating content from presentation involves the use of 'Cascading Style Sheets' (CSS). These are special files that live on your Web server and are linked to your Web pages. They contain information (written in a special markup language) about how to make elements on your site look. They allow you, for example, to define in a single location what all Level 1 Headings look like on your site. They are an important aspect of understanding how to separate content from presentation, but they’re not really an aspect of the difference between static and dynamic sites. Both static and dynamic sites can use style sheets.
1.9.LAMP Environments
When you sign up for colgate.domains, you get space on a Web host that is associated with the project. There are a few things you need to know about the Web host that will make it easier to understand what you can do with your new space.
The Web Server
The Web server is the main computer that is associated with the colgate.domains hosting account. It is literally a computer – a computer that has special software on it that allows it to be accessible via the Web. The files that run your applications, images or video you upload, or any other files you upload into your Web space are stored on this server.
(For comparison’s sake, your desktop or laptop computer, by default, doesn’t allow this; I can’t access files on your computer through a Web browser by default. You CAN actually install Web server software on your own computer, essentially making your files accessible over the Web.)
In order to run, a Web server has an operating system installed and some kind of Web server software. The colgate.domains server runs the 'LINUX' operating system and an 'APACHE' Web server.
The Database Server
In addition to the Web server, there is also an associated database server. This is another computer, but it is configured with software that allows it to host databases. It is also connected to your Web server so that your applications (hosted on the Web server) can retrieve data (from databases hosted on the database server).
Databases come in LOTS of varieties. The kind of database you can use for a Web application depends on the kind of software that’s installed on the database server. The colgate.domains server can run 'MYSQL' databases.
The Programming Language
When you install open-source software on your Web account, it’s going to be written in some programming language. Your Web server has software installed on it that allows it to understand different languages. If you install software that’s written in a language that your Web server doesn’t read, it won’t work.
The colgate.domains server has software installed on it that allows it to understand 'PHP', 'PERL', and 'PYTHON'.
Add it Together: LAMP
If you take a look at all the descriptions above, you can determine that we are running what is known as a LAMP server for colgate.domains:
-
Linux (operating system)
-
Apache (Web server)
-
MySQL (database server)
-
PHP/PERL/PYTHON (programming language)
Applications that are written for LAMP environments will, presumably, run on the server. HOWEVER, some applications do require additional extensions or libraries that aren’t included, by default, in a LAMP environment. The applications you can install via Installatron (in cPanel) should work just fine.
What makes LAMP environments special is that all of the component parts are open-source. Linux, Apache, MySQL, PHP, PERL, and PYTHON are all open-source programs or systems. Anyone can download them (for free) and install them. Anyone can also modify them and redistribute them. As a result, there are lots of online resources for using these systems that have been built by their communities of users. But, also as a result, since you’re not paying for these systems, you can’t just call up a company and ask them to fix a problem.
1.11.What are the technical requirements/limitations?
Colgate Domains uses a Web server known as a LAMP server. “LAMP” is an acronym for the technology stack that is installed on the server:
-
Linux: This is the open-source operating system that is used on the server.
-
Apache: This is the Web server software that the server uses.
-
MySQL: This is the database software that the server uses.
-
Php/Perl/Python: These are the three programming languages that the server can interpret.
Generally, if you are using applications available to install by default through the colgate.domains, you shouldn’t need to worry about these technical details. All of the software that is available for installation (in cPanel) meets the technical requirements.
If you’re interested in finding/installing another application (that isn’t available through our automatic installer tool), then you’ll have to be sure that the server can support it. To start with, you’ll want to be sure that the Web application can run on a LAMP server. Check the technical requirements for the application to determine this. You’ll also need to do some research about whether there are any additional services or modules required on the server. Some software may require components that aren’t included in the default installation of the LAMP stack. In that case, contact us with details about what you need, and we’ll see what we can do.
2.CPanel Dashboard
2.1.Introduction to CPanel
Your Web hosting account on colgate.domains is managed through a control panel interface called cPanel. cPanel is an industry-standard tool for managing your domain and hosting. Using this tool, you can do all kind of things with your Web space including the following:
-
install Web applications
-
view and manage files in your space
-
create subdomains
-
create and configure FTP accounts
-
review access logs for your site
-
manually manage and configure databases
Accessing cPanel has become even easier now! All you need to do is login at the top right of the page at colgate.domains (with Colgate Username and Password) and your website’s cPanel will automatically be displayed upon login.
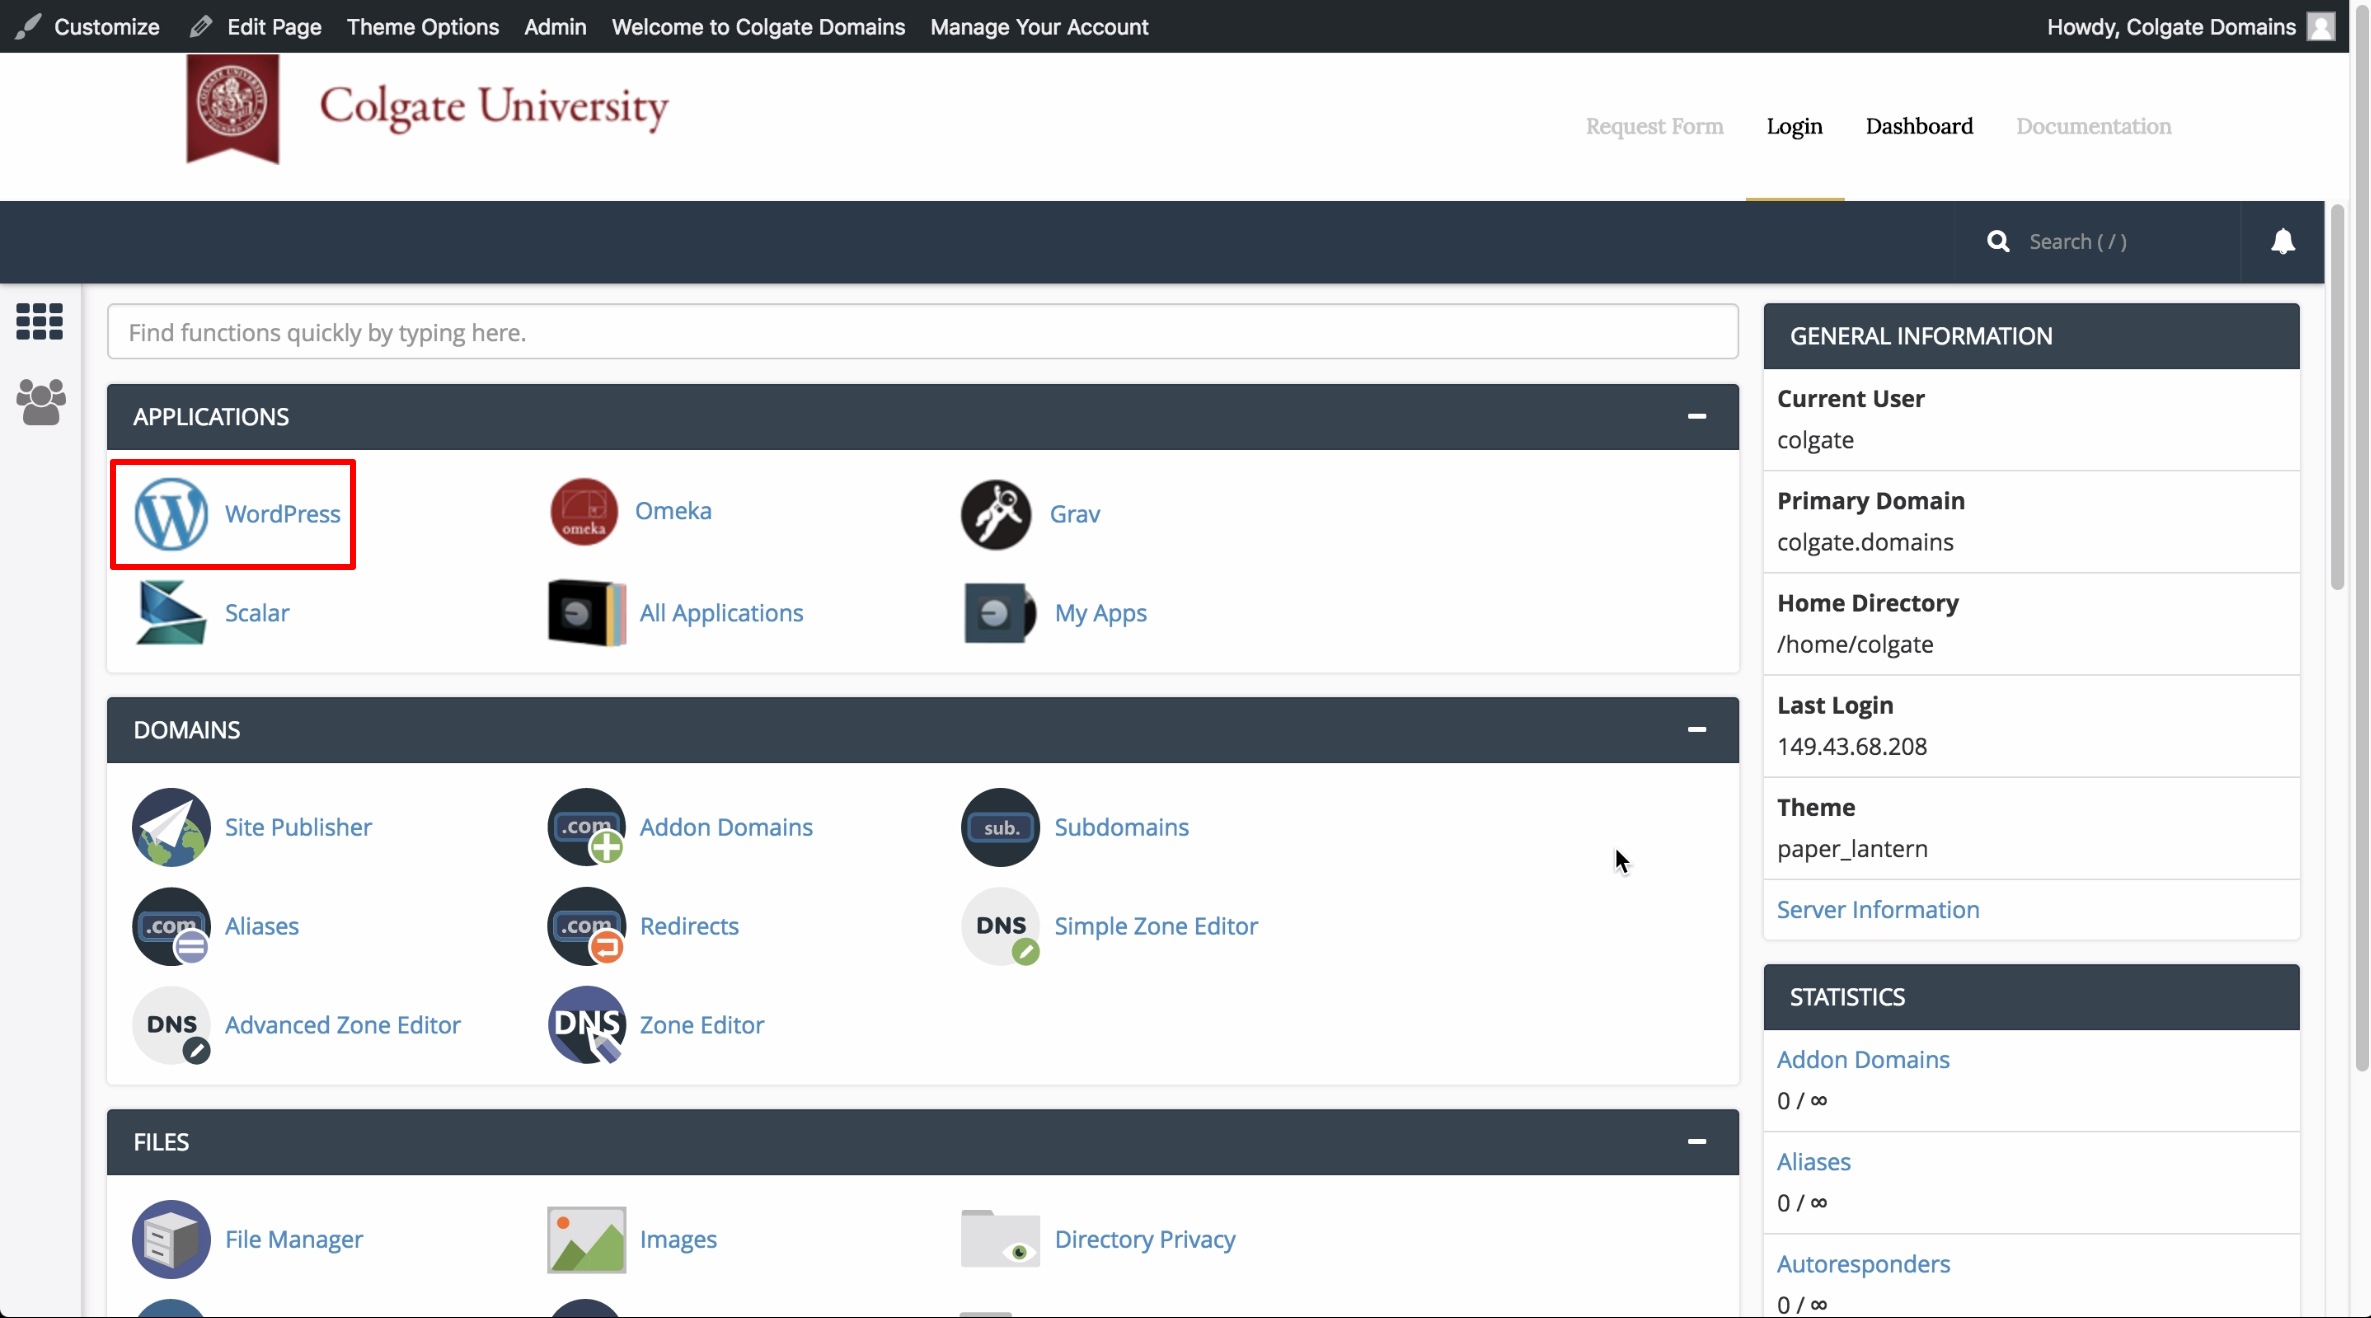
Once you’re logged in, you’ll see the cPanel interface. It is divided into sections, making it easy to locate the different tools and services available to you.
Many of the tutorials on this site walk you through particular tasks in cPanel, but we encourage you to explore on your own, as well.
2.2.Installing Applications with Installatron
Installatron is a script installer that allows you to quickly and easily install Web applications on the Web space. By default, when you use Installatron, the application you add will be automatically upgraded whenever a new version is available (and a backup will be kept, just in case).
- To get started installing applications with Installatron, you’ll need to login to your control panel by going to https://colgate.domains/dashboard/.
- Here you’ll login with your Colgate username and password.

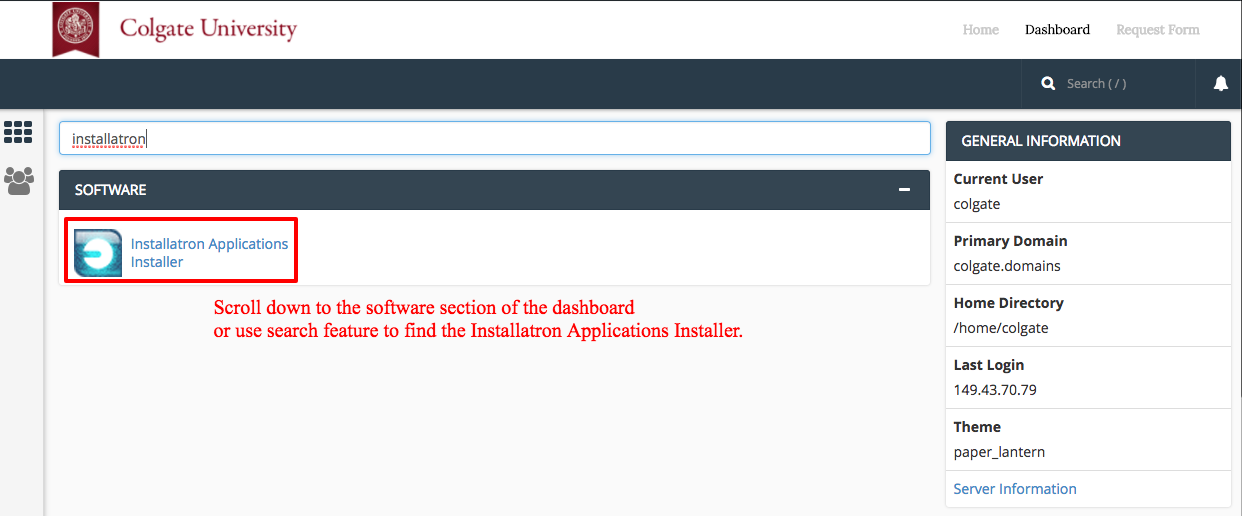
- Once logged in you’ll be at the homepage of your control panel. You will need to scroll down until you see a section of the Control Panel labeled “Software.” Within this section, you will see a link to the Installatron Applications Installer which you should click. Or, you can type “installatron” (without quotes) into the search bar. When you press enter you will automatically be redirected to the Installatron page.
- When Installatron opens, you will see a list of any applications you’ve already installed. To install something new, click on the Applications Browser button (labeled with a large star).
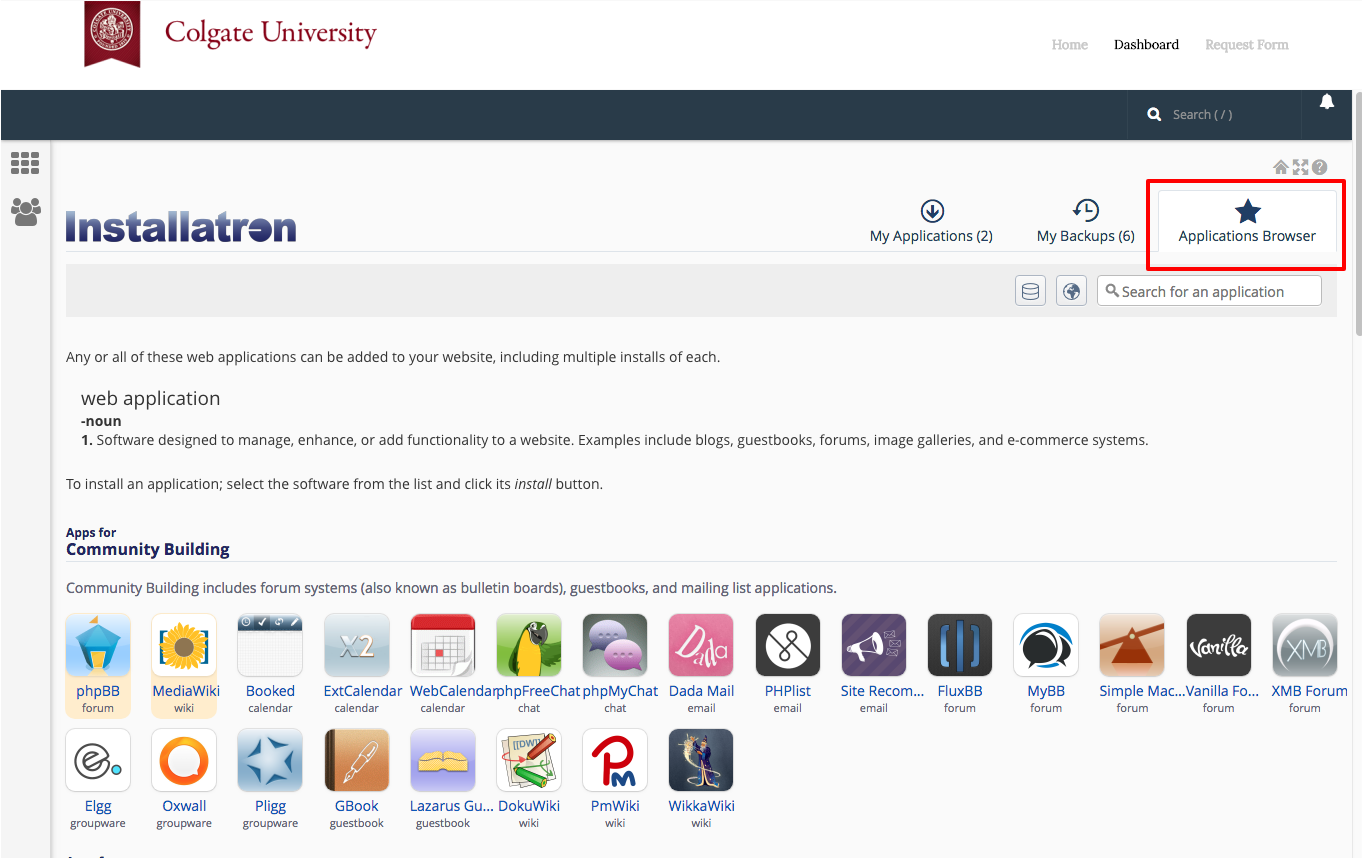
- A listing of all of the applications you can install by default in Installatron will appear. Browse to the one you want to install, and click the icon.
- After clicking the icon, a page will appear with information about the application, links to resources, and a link to install it.

- Click “Install this application” when you are ready.
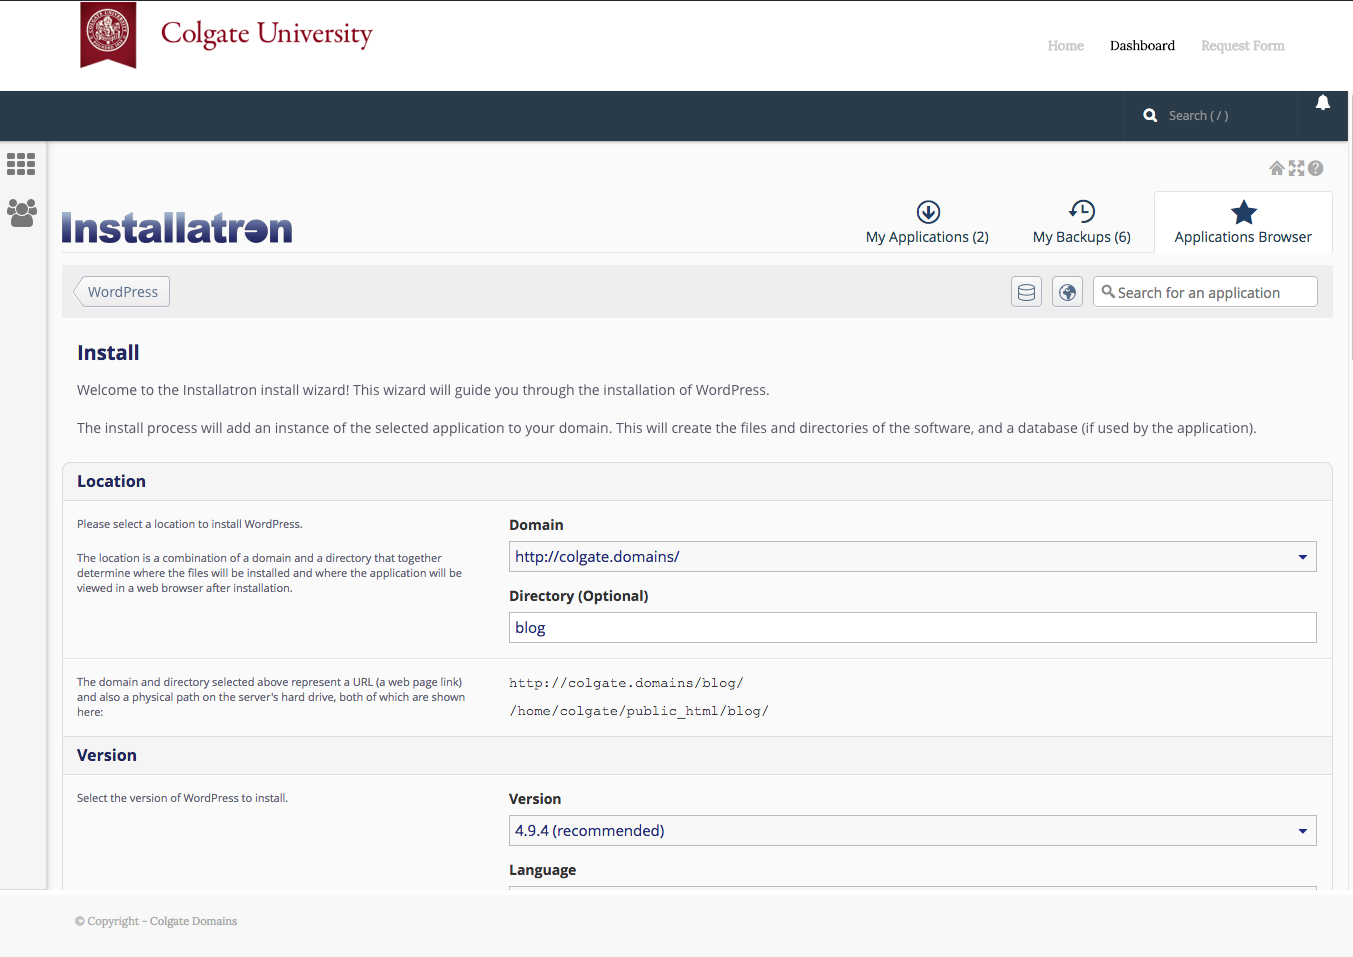
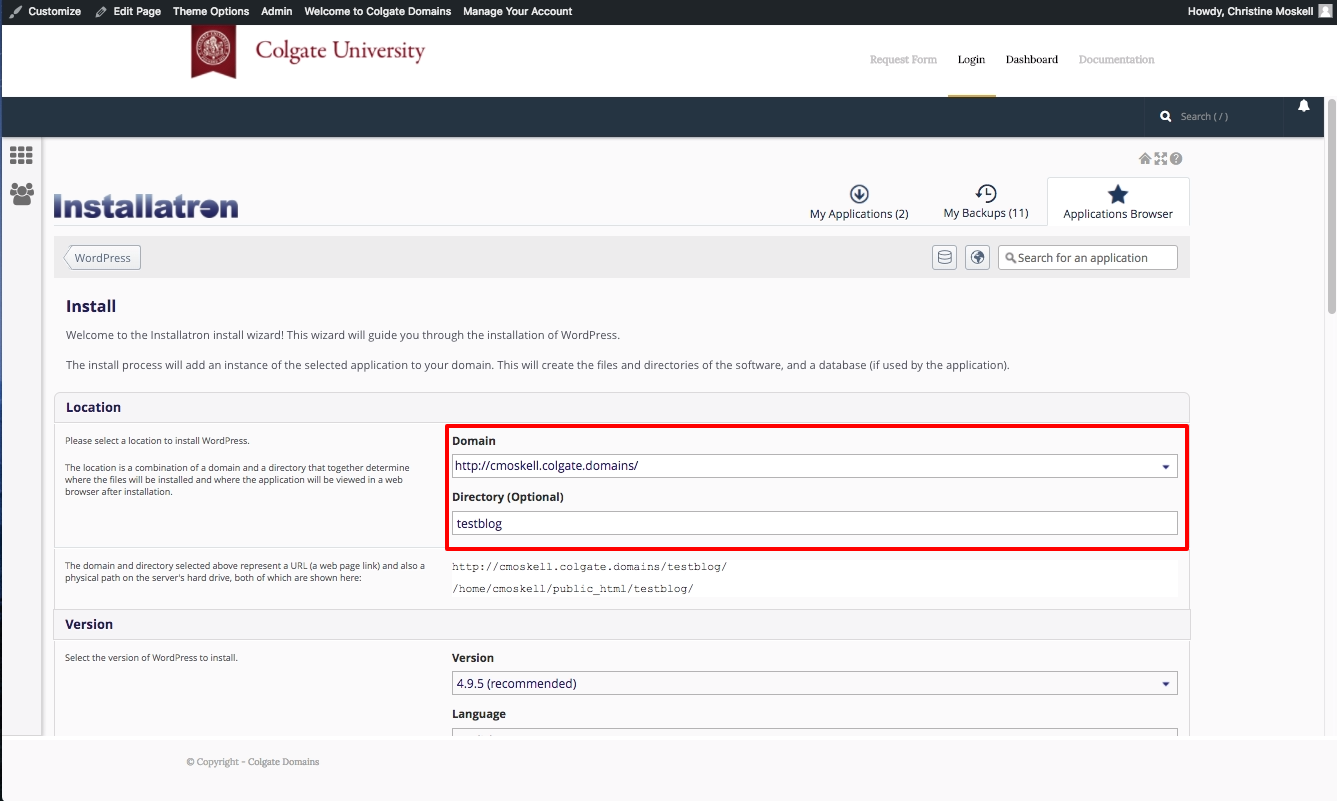
- A page will appear with a number of settings you can choose/change. The image below shows these settings; here is a rundown of them:
-
- Location: You’ll need to choose where to install your new application. You can install it at the root of your domain or in a subdomain (which you need to set up first). In addition, you can place your application in a folder (in either your root domain or a subdomain)
- Version Information: You can choose a version of the application. Generally, we recommend choosing the default version. It is likely to be the most recent, stable release.
- Updates & Database Management: By default, the system is set up to automatically upgrade (and create backups upon upgrading) all applications. In addition, by default, the database will be set up for you automatically. We recommend NOT changing these options.
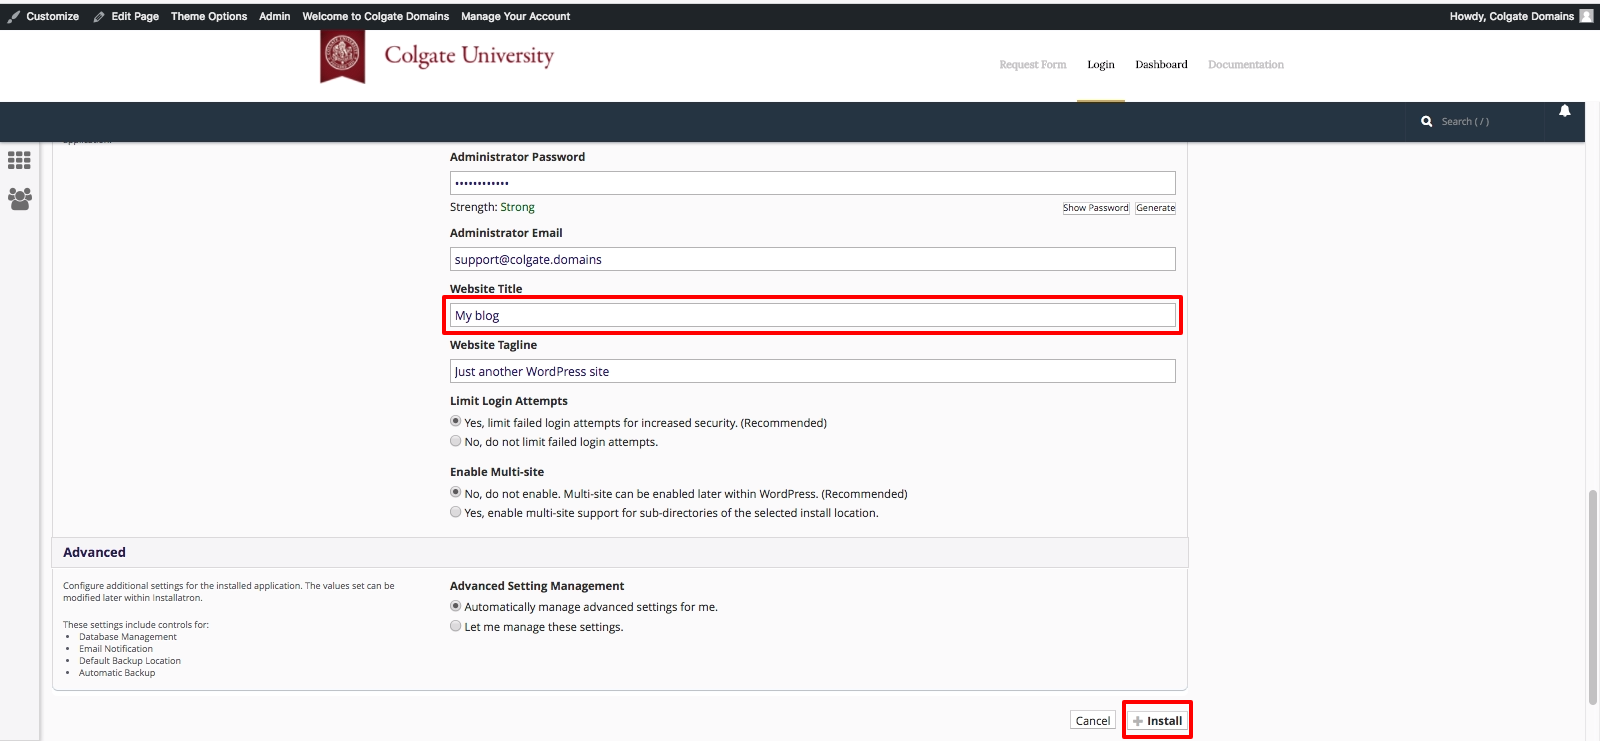
- Username/Password: An username/password will be automatically generated for you. You can choose to change this, if you like.
- Click Install: After installation, you’ll be taken back to the main Installatron page, with details about the application you just installed. At any time you can come back here to review the application details, back it up manually, or uninstall it.
To get to your new site, you can click the “website” link. What’s more, with certain applications you can use this space to login to the admin area.
In addition, you’ll have received an email with your username/password and a link to your new site.
2.3.Applications Available in Installatron
Installatron, the script installer that is part of the colgate.domains cPanel, allows you to easily install Web applications to your Web space. Below is a list of all of the applications currently available to you through Installatron:
Community Building
-
Vanilla Forums
-
MediaWiki
-
ExtCalendar
-
Booked
-
WebCalendar
-
phpFreeChat
-
phpMyChat
-
Dada Mail
-
PHPlist
-
Site Recommender
-
FluxBB
-
MyBB
-
phpBB
-
Simple Machines
-
XMB Forum
-
Elgg
-
Oxwall
-
Pligg
-
GBook
-
Lazarus Guestbook
-
DokuWiki
-
PmWiki
-
WikkaWiki
Content Management
-
WordPress*
-
Scalar*
-
Omeka*
- Drupal
-
b2evolution
-
Geeklog
-
PivotX
-
Serendipity
-
Textpattern
-
CMS Made Simple
-
concrete5
-
Contao
-
ImpressPages
-
liveSite
-
Nucleus CMS
-
phpwcms
-
PyroCMS
-
SilverStripe
-
Soholaunch
-
TYPO3
-
WebsiteBaker
-
Chamilo
-
Moodle
-
phpMyFAQ
-
Code Igniter
-
Coranto
-
MODx
-
e107
-
Joomla
-
Mahara
-
Mambo
-
ocPortal
-
PHP-Fusion
-
PHP-Nuke
-
Tiki Wiki CMS Groupware
-
Xoops
-
Zikula
- Mukurtu
- Dotclear
- LifeType
- Text pattern
- Get Simple
- Grav
- Known
- efront
- CakePHP
- Laravel
- Nette
- Smarty
- Symfony
- Zend Frame
- Subrion
Photos and Files
-
ownCloud
-
Gallery
-
GQ File Manager
-
OpenDocMan
-
Power File Manager
-
ProjectSend
-
Coppermine
-
Piwigo
-
TinyWebGallery
-
ZenPhoto
- Codiad
- Pydio
- Koken
Surveys and Statistics
-
Aardvark Topsites
-
Advanced Poll
-
LimeSurvey
-
phpESP
-
Simple Poll
-
phpMyCounter
-
Piwiki
-
Seo Panel
Miscellaneous
-
YOURLS
-
Tiny Tiny RSS
-
PHPLinks
-
SiteBar
-
iTron Clock
-
WebCards
-
Contact Form
-
Form Tools
-
phpFormGenerator
-
webtrees
-
Feed on Feeds
-
selfoss
-
Search Engine Project
- Wallabag
- OHMS Viewer
2.4.Accessing Your Files through the File Manager
Your colgate.domains cPanel includes a File Manager that allows you to interact directly with the files stored in your web hosting account. This can be useful if you want to upload software that cannot be automatically installed via the Web Applications section of your cPanel, if you need to change the name or permissions of a file or group or files, or if you want to edit a plain text file. To access your files via the File Manager, use these steps:
- Login to colgate.domains with your Colgate username and password.
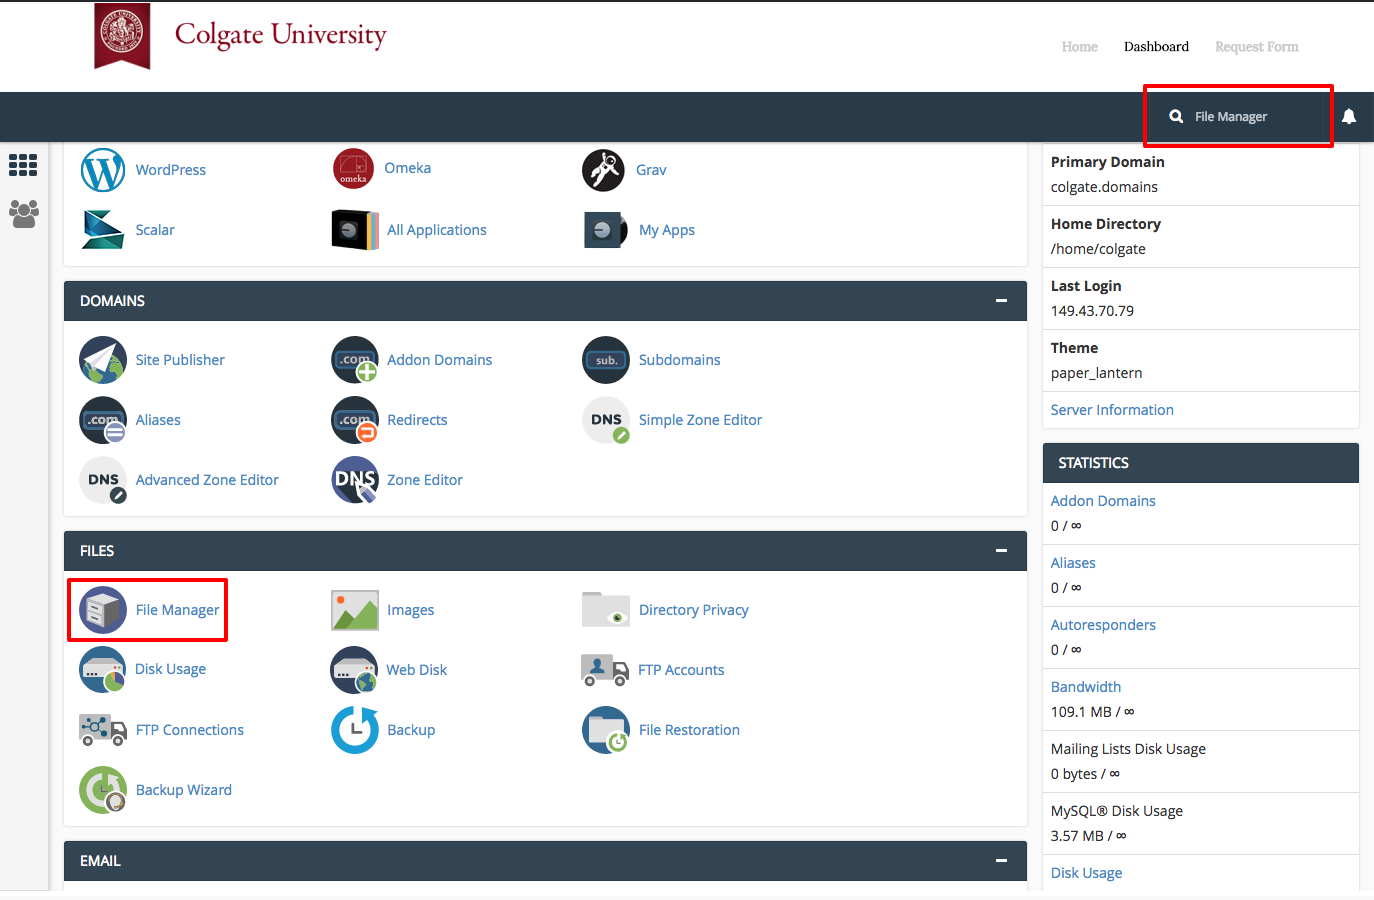
- Once logged in, you’ll be at the homepage of your control panel. The easiest way to navigate the panel is using the search feature in the top right panel. Click the Search box and type “File Manager” (without the quotes). When you press enter, you will be automatically redirected to the File Manager. You can also find its icon under Files.
- On the left side of the “File Manager” window, you’ll see a navigation menu containing the file structure of your webhosting account. More information about the contents of these files and folders can be found in the “File Structures and the File Manager” documentation in this knowledge base.

- In the navigation menu, choose the public_html option. This will take you directly into the folder that contains the files associated with your website(s). You’ll notice your current location (the public_html folder) is bolded and highlighted in this menu. Click the [+] (expand) icon next to a folder to see what subfolders it contains, or click on the name of the folder to view all of its contents in the file browser on the right side of the page. You can also navigate through the folders in your account by double-clicking on them in the file browser on the right side of the “File Manager” page.

- To select an item, click once on its icon in the file browser. You can also use the “Select All” button above the file browser, or your computer’s keyboard shortcuts (Shift, Command, Control, etc), to select multiple items from this list.
- Depending on what you have selected, different options will be available to you in the action menu across the top of the “File Manager” page. If you have selected a folder, for example, you can “Rename” it or “Change Permissions” on it, but do not edit it using the Code Editor or HTML Editor.

- If you know exactly what location you want to skip to within your webhosting account, you can type it into the box directly above the navigation menu and click Go.
 Alternatively, if you know the exact name of the file or folder you are looking for, but not its location, you can use the Search box to find it.
2.5.File Structures and the File Manager
Web hosting is, at its basic core, files and folders on a computer that is connected to the internet and setup to distribute them. How that computer (typically a server) is setup to do that is covered more in LAMP Environments but this article will explain the idea of the file structure and how it relates to what you view on your domain.
When you signed up for your domain, a web hosting account was created. Although you typically will interact mostly with the web interface to create subdomains, install applications, and other common tasks, you might occasionally also need to work directly with the files in your account. The File Manager in your cPanel is one way to see these files. You can also create an FTP account in cPanel and use an FTP program to interact with these files (FTP stands for File Transfer Protocol, and it’s a way of using a desktop client to transfer files to and from your Web server space).
Let’s take a look at the File Manager built into your cPanel to get a better understanding of the file structure that makes up your website(s).
- Login to cPanel with your Colgate username and password.
- On the homepage of your control panel, you’ll have all the various tools listed. You can easily find the File Manager by using the search tool in the upper righthand corner and typing File Manager. You can also find its icon under Files.
- You are now sent to the File Manager and can navigate the folder structure there.
You’ll notice when the File Manager opens up that this looks very much like a folder on your computer. There are a few folders in it as well as files, and you can navigate down into those folders and see what’s inside of them. At the top level of the File Manager, you also have the option of interacting with files and folders you select by moving them around or removing them. There is a larger article all about how to use the file manager at
Accessing Your Files through the File Manager so we won’t talk much about how the interface works, rather we’ll cover what those folders and files actually mean and how they relate to what someone sees when they visit your website.
By default, you have a variety of folders at the root of your web space (the first screen you see when you open up the file manager). Some of them are created automatically to store information about the panel and setup of certain sites. These folders are things like access-logs, etc, ssl, and tmp. You can safely ignore most of those folders because they don’t correspond to actual websites. Let’s look at which folders do and how it all works.
Your main domain, mydomain.com, corresponds with a folder called “public_html.” Whatever files and folders are inside of this folder are available at that domain. If you installed WordPress here you’ll likely see a lot of WordPress-related files within it (which were probably helpfully put there by the automated installer). Let’s say we uploaded an image called mypicture.jpg into the public_html folder. That image would now be available at mydomain.com/mypicture.jpg. The slash after your domain implies “this file is inside this folder”. But what if we had a folder inside the public_html folder? How does that appear? This is typically called a subfolder so let’s put a folder in public_html called “images” and put our image, mypicture.jpg, inside of that folder. What would you type in a browser to get to that file now? The location would be mydomain.com/images/mypicture.jpg. So subfolders are also indicated by a forward slash after a domain.
2.6.Setting Up FTP
There may be times when you need to place files onto your space on your Web server. There are a number of scenarios when this might be necessary:
-
You’re working with an application that allows you to install plugins/extensions, but the files need to be manually moved to the server in order to add them. (Note: This is NOT required with WordPress which allows you to install plugins through the backend in your browser.)
-
You’ve developed a custom site/pages using a Web design program, and you need to upload the files you created to the server
-
You’re installing an application that isn’t part of the applications in Installatron.
One way to upload files is by using the File Manager that is part of cPanel. However, sometimes you’ll find it easier/necessary to use FTP, or File Transfer Protocol, to move files to the server. This can be particularly useful if you’re working with a Web space where you’re not the owner (so you don’t have access to the File Manager in cPanel) or if you need to provide file access to someone else to your space on the Web server.
What exactly is FTP?
File Transfer Protocol is a method that allows you to remotely move files to a Web server from another location – usually your local/personal computer. Using a pre-defined FTP account (with a username and password), you can configure an FTP client (a program you run on your computer that allows you to transfer files via FTP.
There are lots of FTP clients that you can use; some are free and some are not. A few free ones you might consider:
For the purpose of this tutorial, we’ll show you how to set up FTP in FileZilla, but you should be able to generalize these instructions to use in any FTP client.
Get Information about Your FTP Account
If you’re FTPing to your own space on the Web server, or if you’re setting up an FTP account for someone else to use to FTP to your space, you’ll need to start by getting information about the FTP credentials from cPanel:
- Login to colgate.domains.
- In the Search Box at the top of the page, search for “FTP”, and click the FTP Accounts icon that appears.
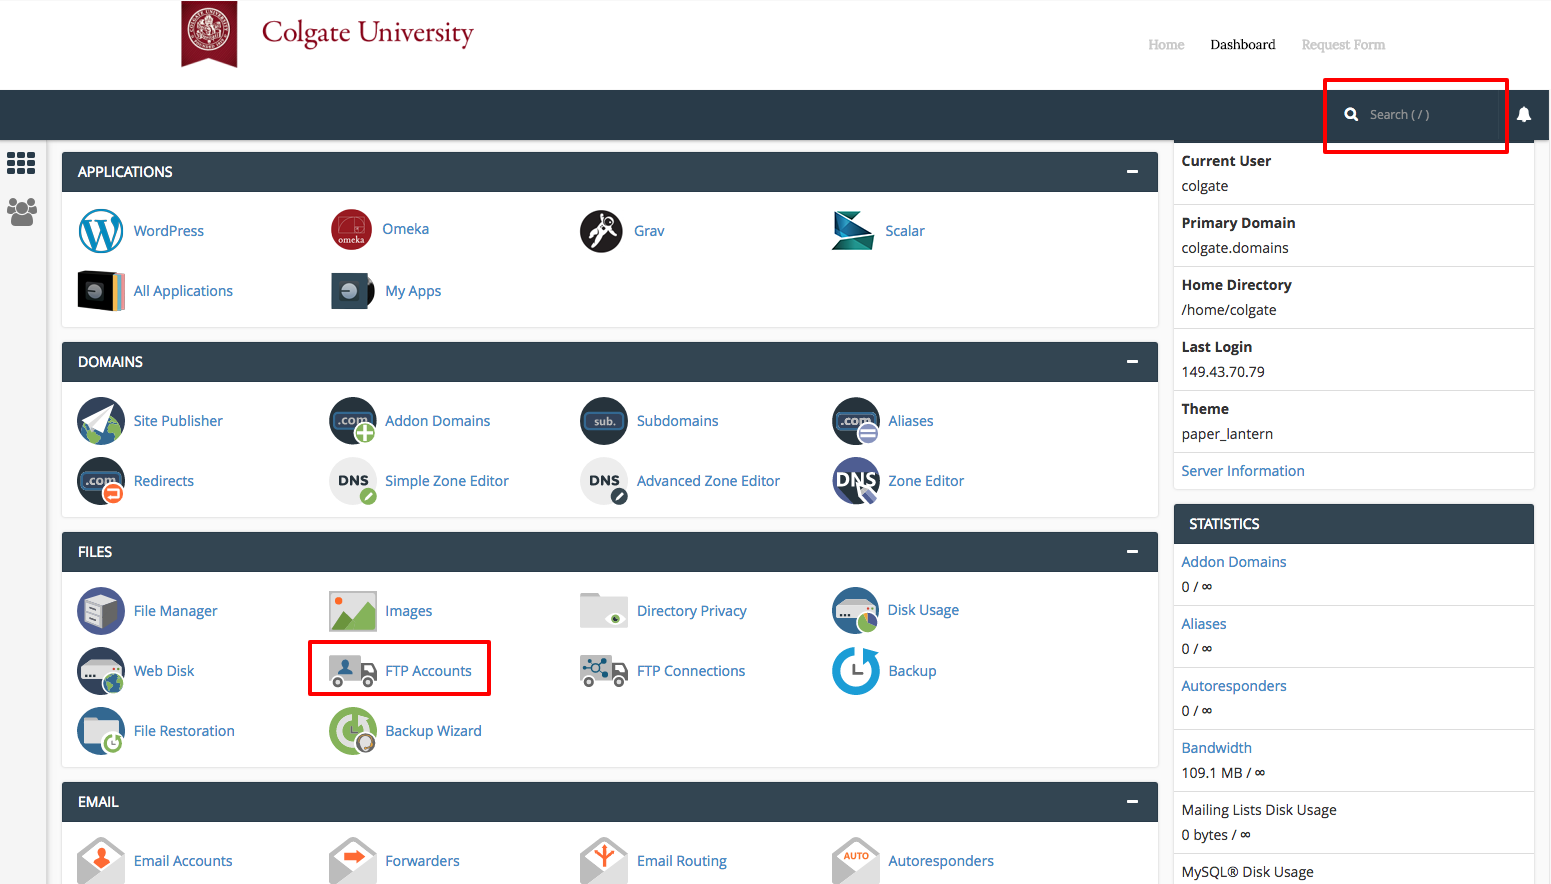
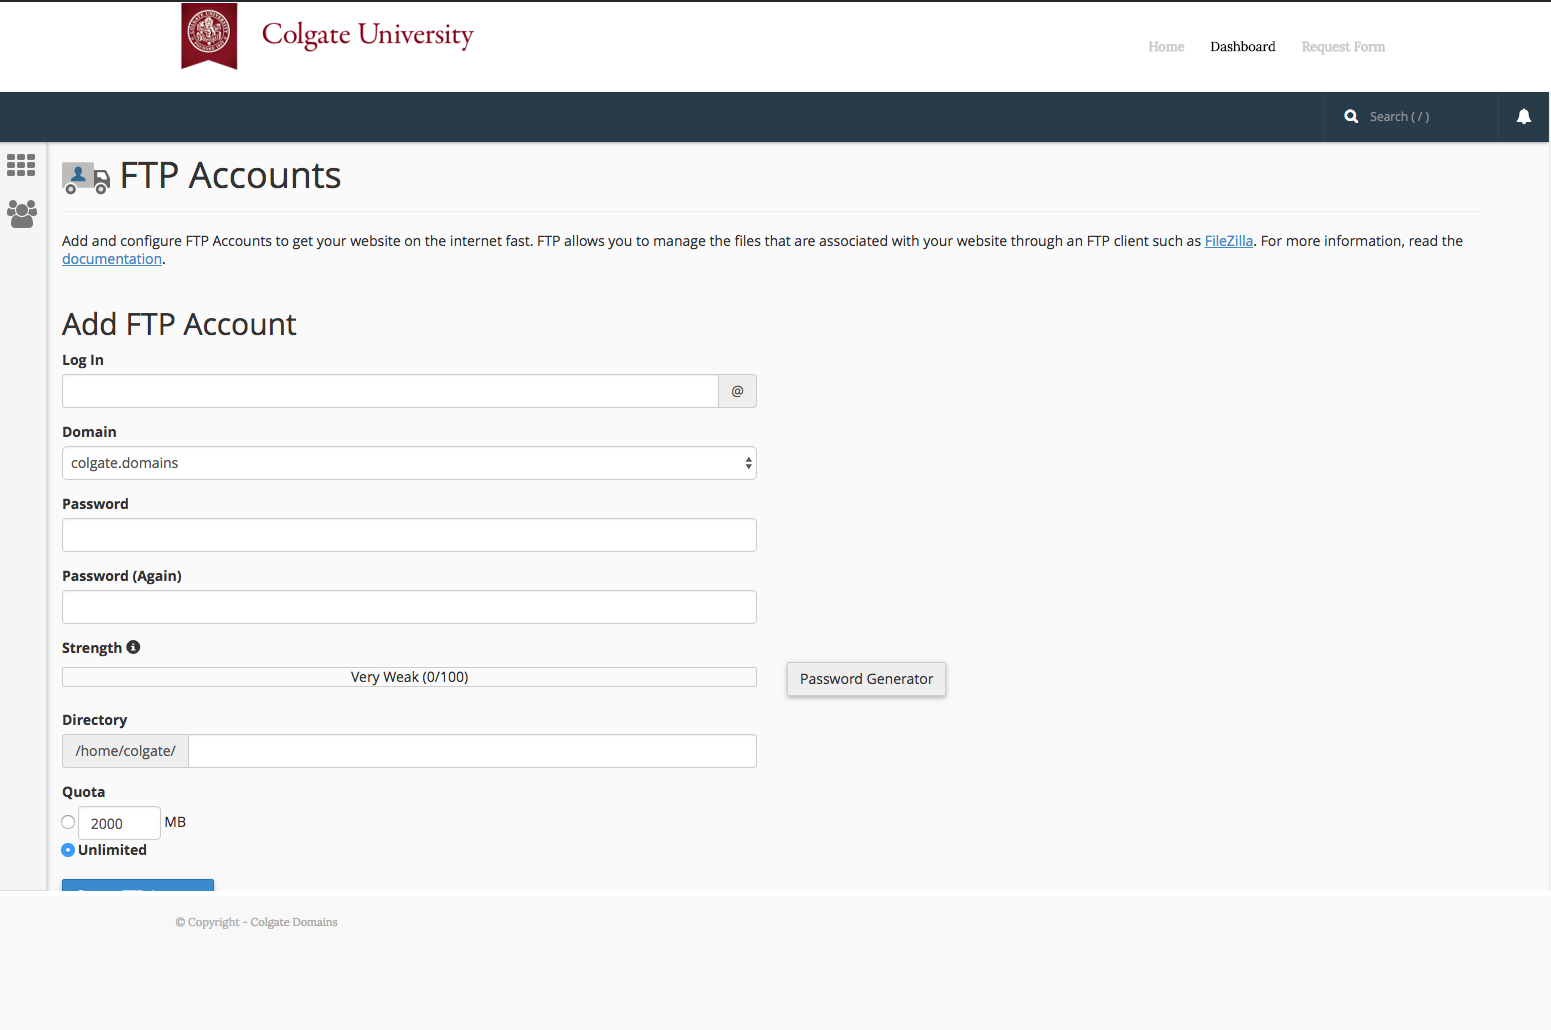
- You’ll have the option to create a new FTP account, or you can scroll down the page to find the credentials for the default FTP account. If you want to create an account, fill out the Add FTP Account form with a username and password. By default, the new FTP account will be limited to a directory with the same name as the account you’re creating. You can change this to a different directory, if you want to grant this account access to a different location. NOTE: Make sure you know/remember the password you enter. When you’re done, click Create FTP Account.
- Once you’ve created the new account, you’ll see it appear in the list at the bottom of the FTP Accounts page. In addition to any accounts you’ve created, in the Special FTP Accounts section, you’ll see the default FTP Account. You’ll know this account because the username corresponds to your cPanel username. This FTP account has full privileges to access any space on your Web server.
- For whichever account you need credentials for, click the Configure FTP Client link.
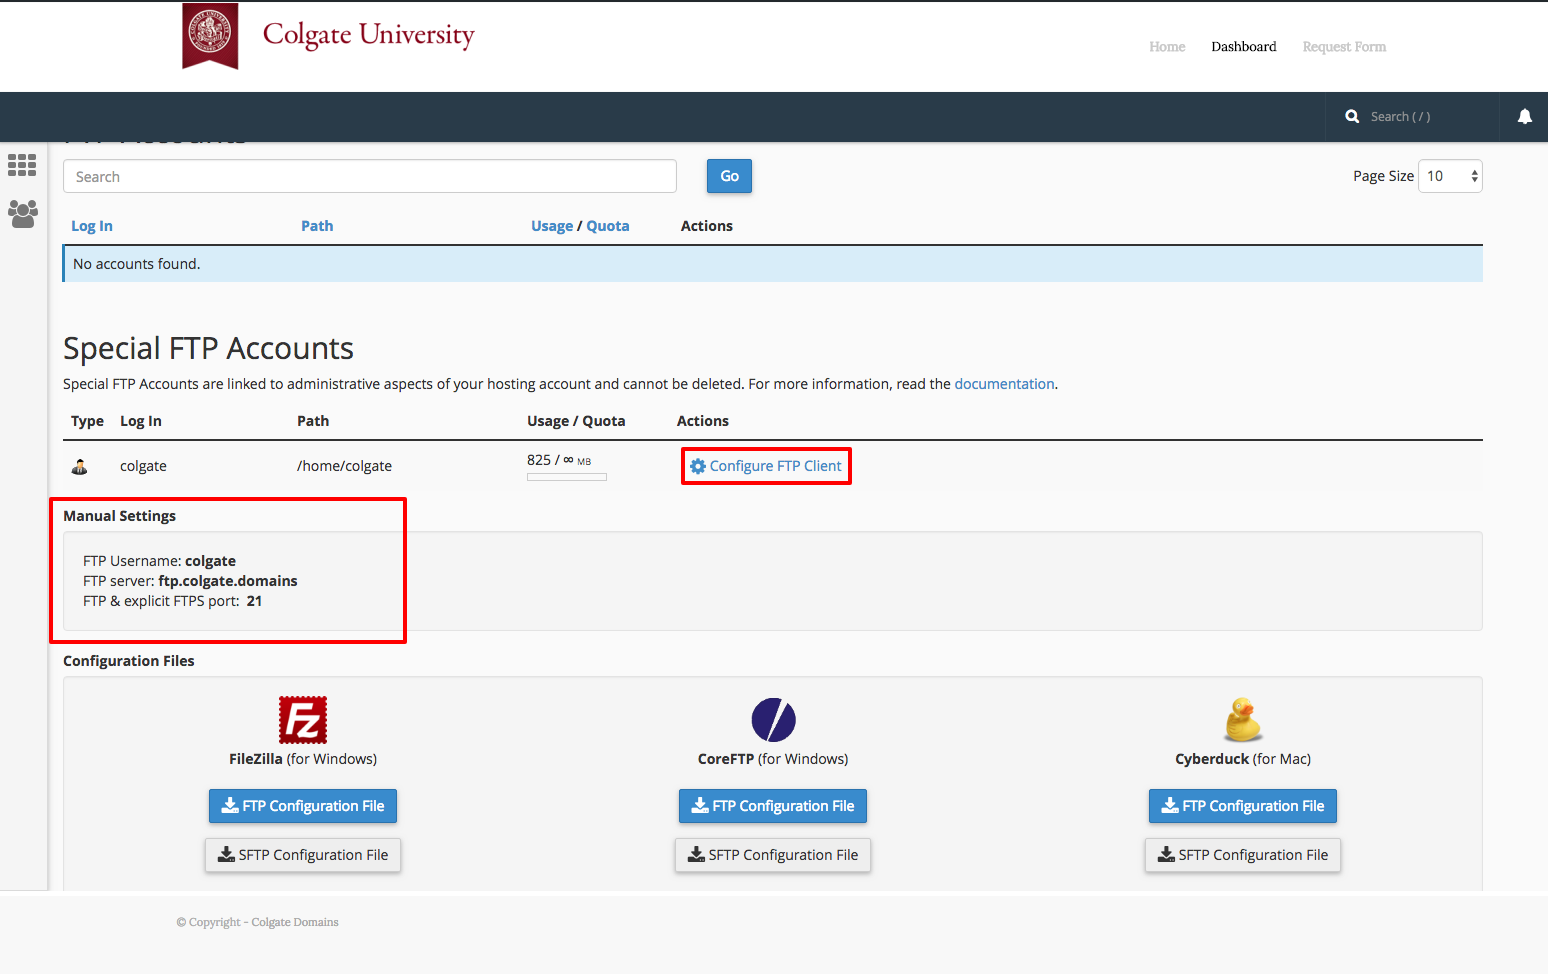
- Write down the username, server, and port information that appears. You will need to use this (or you will need to provide this to the person you are giving FTP access) along with the password you created in Step 3 in order to configure your FTP client.
Configure FTP in Your FTP Client
Below are links to tutorials for setting up both FileZilla and CyberDuck to connect to you FTP account.
2.7.Organizing your Site with Subdirectories
When you’re first getting started with a new space on a new Web host, you might think of yourself as owning a small “territory” of the Web. Everything you place in your public folder on the server becomes available for anyone on the Web to see (assuming they know the address of your site and the files you’ve placed there).
If you’re just putting up a handful of static, HTML pages which you want to make available to colleagues, friends, or family by sending them links, then working with this large, unorganized space may work. But as soon as you get to the point where you want to organize your site, you’re going to need a new strategy.
Consider this scenario: you want to have a personal blog on your new Web space, where you share pictures and short written pieces with family, friends, and colleagues. In addition, you’re working on a large research project that requires you to build a Web-based repository of digital images related to your discipline. You want to use one application (say, WordPress) to manage your personal blog. For your research project, you’ve settled on another open-source application (Say, Omeka). Both of these are applications that need to be installed on your Web host, but you can’t just put them both at your main domain name – if you did, both sites would quickly experience conflicts and errors. You need to cordon off separate spaces for your different Web “properties.”
There are two primary strategies for parceling up your Web space. You can create subdomains or subdirectories. But before you can understand the difference, you need to first understand what we mean when we talk about your root domain.
Root Domain
Let’s say you’ve registered a new domain for colgate.domains called yourdomain.com. Anything that is stored at this core URL is considered to be at the root of your domain: Nothing comes before the address or after the address. You can certainly decide that you simply want to have a single site on your Web host (say a blog running WordPress), and you can set that blog up at your domain’s root. To get to your site in this scenario, users would simply go to yourdomain.com.
Subdirectories
Subdirectories function much like file folders on your computer. Instead of creating a blog at blog.yourdomain.com you would place it in a subdirectory called “blog” making the address yourdomain.com/blog. Setting up subdirectory is really easy. You can create folders on the fly when installing applications (like WordPress), and you can also manually create them in your file browser.
There is one particular issue you need to be aware of. Let’s say you’ve installed WordPress to be your primary blog at yourdomain.com. Later, you decide you want to create another image gallery site on your site, and you want to place it at yourdomain.com/gallery. But, if for some reason you’ve already created a page on your WordPress site called “Gallery” then the url yourdomain.com/gallery will already be taken. If you try to create a subdirectory of the same name, you’ll get a conflict and errors.
Tips & Review
-
Subdirectories don’t create as pretty URLs as subdomains, but they’re easier to set up. They can, however, result in conflicts with existing Web pages.
-
As soon as you create subdomains or subdirectories to organize your site, you need to consider how people are going to find them. If you’ve created a new primary blog at blog.yourdomain.com, and someone goes to just yourdomain.com, they won’t see that new site. It is possible to set up redirects to avoid this issue. You can also always create links from pages on one subdomain of your site to another.
-
If you really just need one site, sometimes installing at the root of your domain is the easiest thing to do, at least as you’re getting started. You can always add more pieces to your territory later with either subdomains or subdirectories.
3.Domain Management
3.1.What is DNS?
Remember back before everyone had computers that fit in their pocket, how companies would ship a book full of phone numbers to your doorstep? We might have known who we were looking for, but we needed to look up phone numbers unless they were your crazy relatives that you learned to memorize. When you get your own domain name, by default it’s nothing more than a shortcut, an address, or (to fit this very imperfect analogy) a phone number. When you type a domain name into the address bar of your browser, someone has to identify it and tell it what to display. That’s where a name server comes in.
A name server is a computer, running as a server, that keeps a record of all the domain names that are associated with it and keeps track of where those domains should go. In the case of colgate.domains, the name server is the same computer that runs the hosting. You can peek behind the hood and see this in action by going to the 'Websites and Domains' tab of your panel account and clicking on 'DNS Settings'. You see, DNS stands for Domain Name System and the name server on colgate.domains gives control to it to identify what should be displayed when someone types in your domain. Consider the fact that you might have one or more subdomains in your account. The name server and DNS are able to identify those subdomains and let the world wide web know that they exist and point to some files/folders on a computer somewhere.
When you signed up for a domain through the colgate.domains system your name servers were chosen for you. So when people type in your address, the server responds with information about your account. When you migrate an account away from one hosting platform like colgate.domains and onto a new service, it will require you to change the name servers so that your domain name points to a new server with its own files and structure. It’s also possible to have subdomains that point to entirely different servers than colgate.domains. For example, you could have a subdomain that looks to Tumblr for files.
3.2.What is Domain Mapping?
Domain mapping, simply put, is deciding where visitors should be directed when they visit various pieces of your website. Domains and subdomains can be mapped directly to folders located within your webhosting account, where you may have installed WordPress, Omeka, MediaWiki, or other web applications. Domains and subdomains can also be mapped to some third-party providers.
3.2.1.Map Your Domain to Third Party Services
Mapping your domain is an important part of colgate.domains; it reinforces the idea that you don’t necessarily need to host all your own applications. You should, however, be mindful of making your web presences part of a domain you control. You will be responsible for maintaining and renewing the registration of any site created with a third-party service (e.g Blogger, Tumblr).
If you would like to map a subdomain and have not yet created it, use this tutorial on creating subdomains before proceeding. To map your domain to third-party services, use these steps:
-
To get started you’ll need to login to your control panel by going to the colgate.domains homepage and logging in.
-
Here you’ll login with you Colgate username and password.
-
Once logged in you’ll be at the homepage of your control panel. The easiest way to navigate the panel is using the search feature in the top right panel. Click the Search box and type “DNS” (without the quotes). Click on Advanced Zone Editor and you will automatically be directed to the DNS Advanced Zone Editor page. Or, you can scroll down and click on the DNS Advanced Zone Editor button on the cPanel.
-
Find the domain, or subdomain, you want to map to Blogger in the list of Zone File Records. Under the Action column, click Edit.
-
Leave the Name, and TTL fields set to their defaults. Update the Type drop-down menu to CNAME, and the Address field to ghs.google.com. Click Edit Record when you are done. Keep this window open; you will need it in later steps.
-
In a new window, go to the Blogger website, and login with your Blogger/Google username and password.
-
From your Blogger Dashboard, find the blog you’d like to use, expand the More Options menu, and click Settings.
-
On the “Basic Settings” page, find the Publishing section, and click the Setup a 3rd party URL for your blog link.
-
Under Advanced Settings, type the full subdomain or domain you are mapping into the box, leave the Use missing files host? option set to No, then click Save.
-
You will be presented with a message that your domain cannot be verified, along with information about your existing DNS entry, and an additional DNS entry that needs to be made. This is normal. Copy the second entry under the Name, Label, or Host entry to your clipboard.
-
Go back to the window or tab containing the Advanced DNS Zone Editor in your colgate.domains cPanel. In the Add a Record section, paste the text you just copied into the Name field. This information will be different for each domain. Set the TTL field to 14400, and the Type drop-down menu to CNAME.

-
Go back to the window or tab containing the Blogger Advanced settings panel, and copy the second entry under the Destination, Target, or Points to column to your clipboard.
-
Go back to the window or tab containing the Advanced DNS Zone Editor in your colgate.domains cPanel. In the Zone File Records section, find the domain you were editing Action for and paste the text you just copied into the CNAME field. This information will be different for each domain. Click Edit record when you are done.
-
Return to the window or tab containing the Blogger Advanced settings panel, and click Save.
-
If everything was successful, your domain will now appear as the Blog Address. Keep in mind that it may take up to 72 hours for your domain or subdomain to correctly point all visitors to the correct location.
4.Applications
4.1.Wordpress
WordPress is an open source blog application. WordPress forked from b2/cafelog in 2003, and WordPress Mu multiple website functionality has been integrated since 2010. Today WordPress is the most used blog application powering millions of blogs and being used by tens of millions of people every day.
Installing WordPress
WordPress is an open-source publishing platform that can be used for setting up a blog or website easily. In fact it’s one of the most popular publishing platforms on the web. Setting up a WordPress install on your own domain can be done by following this video tutorial and/or these simple steps:
- Once logged at https://colgate.domains you’ll be at the homepage of your control panel. Scroll down and look under Web Applications, then click the WordPress button.
- This page gives you more information about the WordPress software. To begin the install click Install this Application in the upper-righthand corner.

- On the next page, the installer will ask for some information about this install. The first thing you’ll want to do is decide where to install it. For example, you could install it in a subdomain you have created by selecting it from the dropdown menu. You also have the option of installing WordPress in a subfolder by typing in the folder name in the Directory field. Click here for more information about subdomains.
- By default the installer will automatically backup your website and update it anytime a new version comes out. While we recommend you keep this option, it is possible to only do minor updates, or turn them off completely. The installer will also create a database for you automatically, but if you’ve already created one for this website you can choose Let me manage the database settings and enter the details. Finally, you’ll need to create an initial username and password for the WordPress install. Enter that information in the final section and click Install.
- The installer will take just a few moments to install WordPress and a progress bar will keep you updated. When it is complete, you will see a link to your new WordPress site as well as a link to the backend administrative section for your WordPress site.
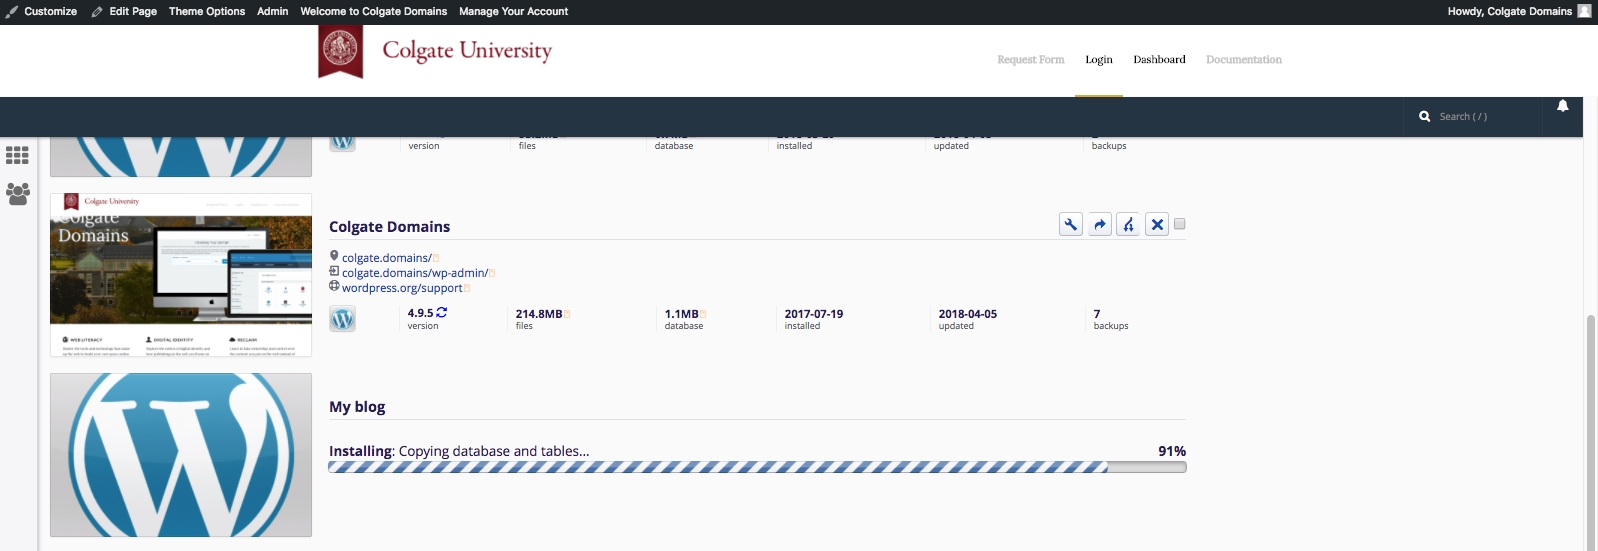
Congratulations, you’ve now installed WordPress! Now you can start customizing it with themes, plugins, and more.
General Settings: Title and Tagline
Now that you have your WordPress installed and running, it’s time to look at some basic settings for your site.
- The place that you will access the settings for your site is called the Dashboard, and it provides the starting point for accessing all of your sites dials and knobs.
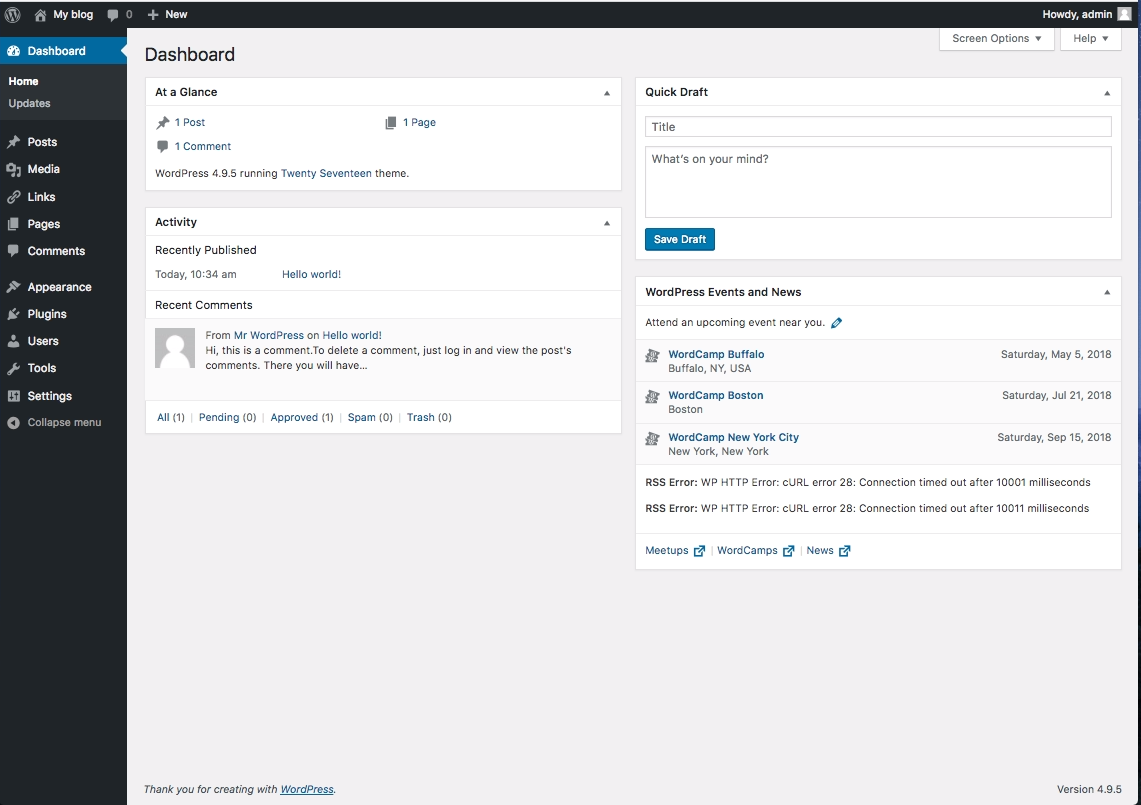
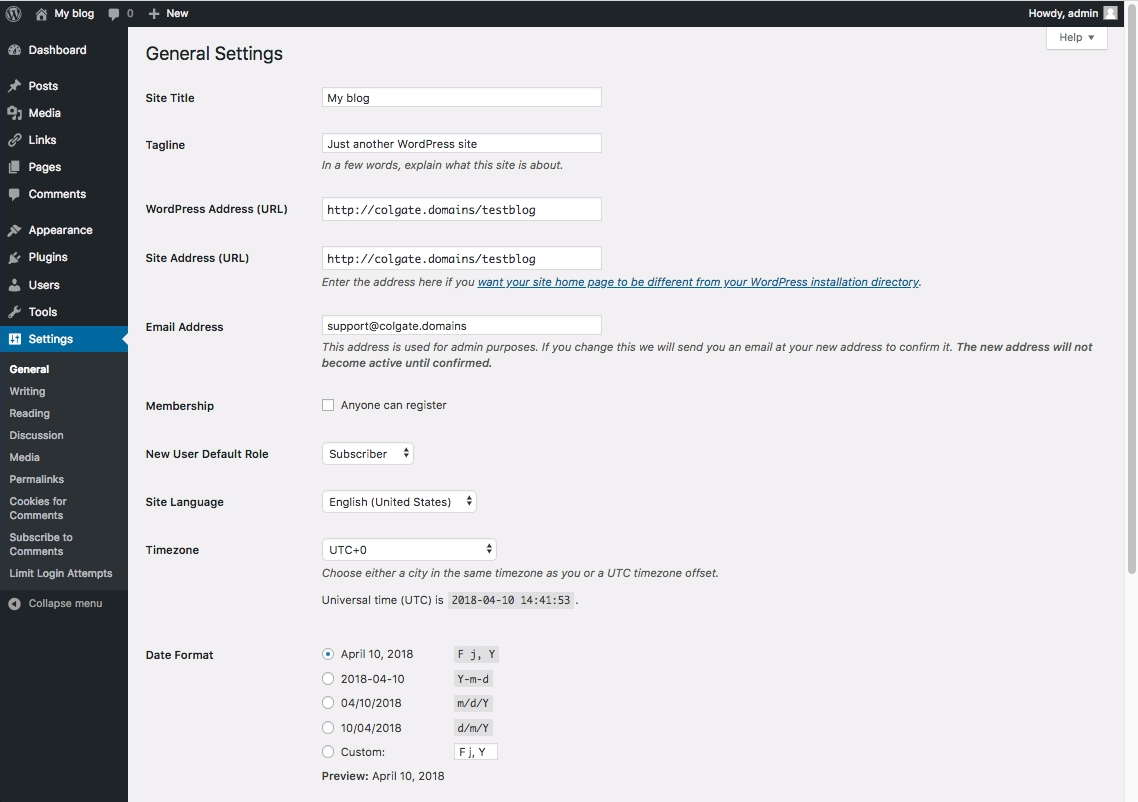
- The setting we will look at here is your blog “title” and “tag line”. It is located under Settings > General. Once you’re on the General Settings page, you can give your blog any title you want. You can also give your blog a tagline, which can be a short description of the blog.
When you change the Blog title and tag line, they will show up at the top of your site. Depending on what theme you use, the title and tag lines will show up in various places. In the case of some themes, they might not show up at all depending on whether they allow custom configurations. We won’t worry about that for now.
There are more settings on the General Settings page, such as setting the administrative email account, time zone, date format, etc. Change those to whatever is appropriate for your site and geographical location.
WordPress Themes
When it comes to WordPress, customizing the look of your site is simple and straightforward. When you install WordPress, the default (or pre-set) theme is called Twenty Seventeen (as of WordPress version 4.8). It is a very customizable theme.
You can find general information about Twenty Seventeen here.
In addition to Twenty Seventeen, you’ll have other themes available to you. (What themes you have depends upon if you did a default WordPress installation, or if you installed a special package.) If Twenty Seventeen doesn’t meet your needs, you can activate another theme on your site or install a completely new one.
Activating Themes
-
Start at your site’s Dashboard.
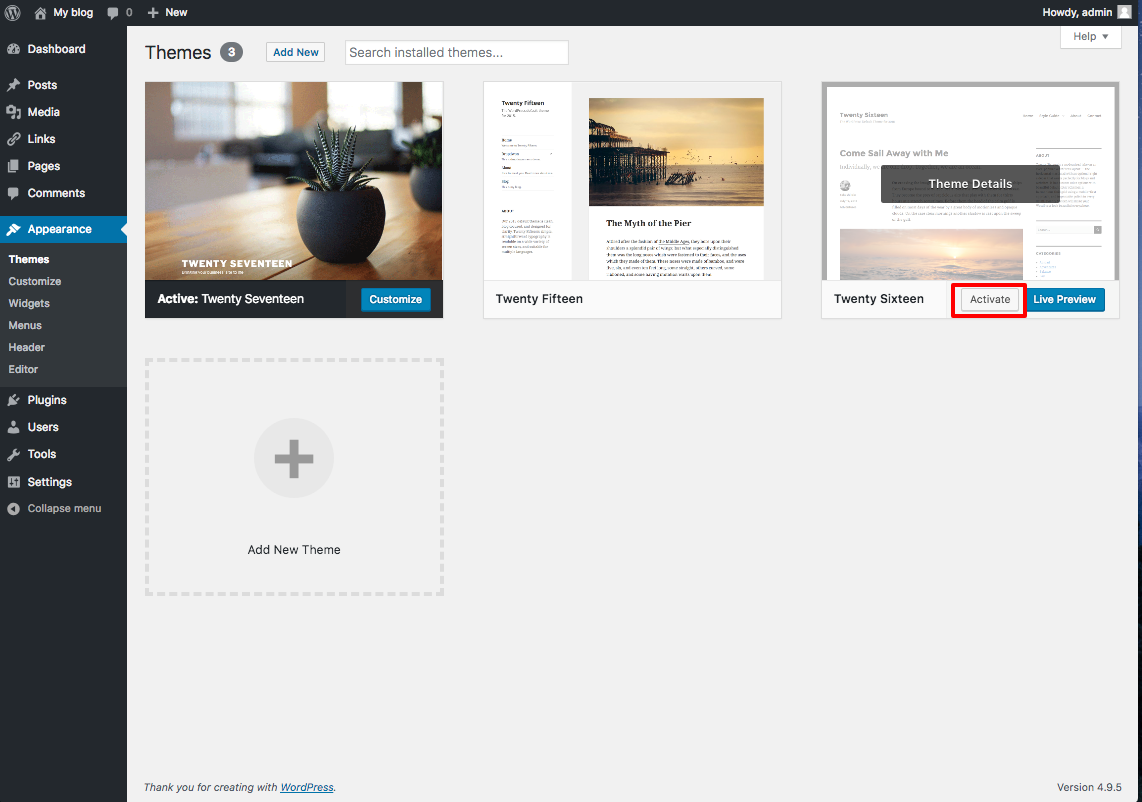
- Navigate to Appearance > Themes.
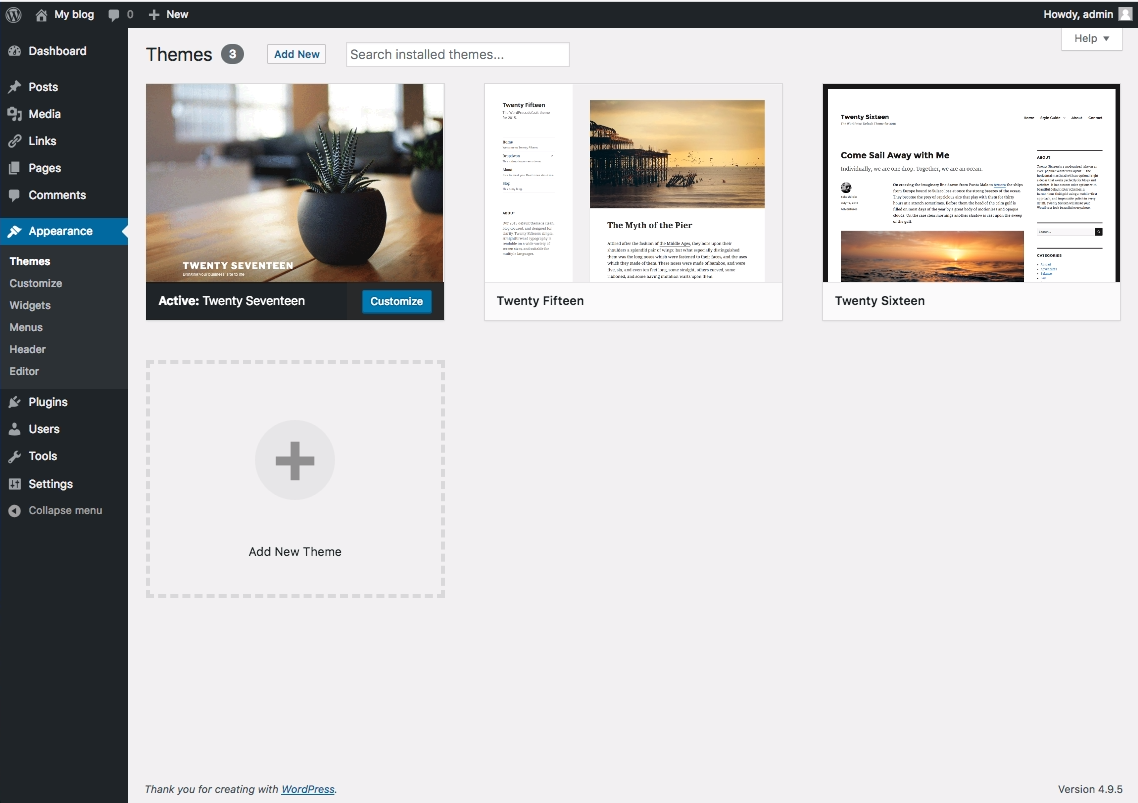
- You will see thumbnail images representing each of the themes that you currently have available on your site. Simply mouse over any one of them, and click the Activate link.
That’s all you need to do to change the look of your site with a new theme.
Installing Themes
If none of the themes that were provided when you installed WordPress are what you’re looking for, you can always search for and install other themes from the WordPress Theme Repository.
- Navigate to Appearance > Themes.

- Installing new themes is quite simple. You start by going to the Add New Button.

- The initial page is the Search Theme page, and it’s not all that helpful (or visual). You can check a few “filter” boxes to see what comes up, but there is a more visual way. Click the Featured link at the top and you’ll get visual (screenshot) examples of other themes you can install. You can also click “Newest” or “Recently Updated”.

- Under the thumbnail picture of each theme (when you hover your mouse over the theme) are three choices – Install, Preview, and Details & Preview. Those choices should be pretty self-explanitory so click Install to add a new theme to your site.

- After you install the theme, it is still not active on your site. You will need to Activate it to use it.

Once activated, your site will be using the new theme. Visit your site’s homepage to view your new theme.
Publishing Content
The primary activity that you’re likely to be doing on your WordPress site is publishing content. The content could be text you write, pictures you take, videos or audios (which may be hosted on another site), or other media that you’ve found elsewhere on the Web. WordPress makes it very easy to publish media content of all types, whether hosted on your actual Web server or elsewhere.
Posts vs Pages
Out of the box, WordPress provides two primary content types for you two work with: posts and pages. If you read blogs or have ever written for a blog before, the concept of a post is probably a bit familiar. Posts often are content that appear on your blog in some kind of scheduled way. They usually are presented on your site in reverse-chronological order. Posts might be what you use to share your regular thoughts, reflections, or ideas about a topic. Posts make up a kind of “river” of content that you’re producing as part of your blogging activity.
Pages usually correspond to our more traditional concept of what makes up a Web site. Pages are presented outside of the “river” of content that are posts. They are more likely to stand alone and be organized according to a traditional hierarchy. Pages might be content that is less frequently updated or changed.
If you were using WordPress to build a business Web site with a lot of information content, you would probably use Pages. If you added a feature to that site where you started to advertise special events or news, you would probably use Posts.
A few other things to know about Pages vs Posts:
-
If you want your content to be accessible to your users via RSS/syndication, you’ll need to use Posts. By default, Pages do not appear in a site’s RSS feed.
-
Categories and Tags (which are used in WordPress to help you organize your content) are ONLY available on Posts. Page organization is done through customizing your site’s menus.
-
Okay this get’s a little tricky: WordPress, by default, also creates “Category Pages” and “Tag Pages” that display all the Posts in a category or tag. These are NOT related to the regular Page type.
Media
Upon occasion, you may want to include media (images, audio, video) in your site’s posts and pages. There are generally two approaches to handling media in WordPress:
Uploading: You can upload the files into your site’s Media Gallery and then link to them in your posts/pages. This works very well for images, and when you take this approach for images you have the added benefit of being able to make use of WordPress’ built in (albeit rudimentary) editing tools. Also, when you upload images to WordPress, it automatically creates different sizes that you can use, as needed. This approach works less well for audio and video. In order to have your media files actually show up in a “player” (with controls for stopping, pausing, etc.) you’ll need to install a plugin. Otherwise, you’ll only be able to include links to the files. How people view/listen to them will depend a bit on the setup on their own computer and in their own browser. They may, for example, have to download the media file and then open it in another program on their computer.
Embedding: You can embed media from other sites easily in WordPress. Embedding an image just means providing a URL to it’s location elsewhere on the Web. Instead of uploading it to the server, WordPress grabs that image from the external source and displays it on your post/page. However, with this approach you lose your editing capabilities as well as the resizing feature. Embedding audio and video from external sources becomes easier with every version of WordPress it seems. These days, you can embed video and audio from many external services (YouTube, Vimeo, SoundCloud, complete list here) by simply placing the full URL of the audio/video location on it’s own line in your post/page. There is a complete list of supported external services, and you can learn more about embedding from external sources at the WordPress site. Our general advice is to use externally hosted media whenever it makes sense and works. This is usually the case when you need to use audio or video; without plugins, well-presented audio and video in WordPress is tricky. For images, if you need to do basic editing and/or require different sizes of images, upload them to your site. Otherwise, consider referencing them from another location (your Flickr account, for example).
Post Formats
Recent versions of WordPress have built out a new “post format” feature which, if you are using a theme with the feature enabled, will style post formats differently depending on what they are. The formats that are built-in to WordPress (and are available for theme developers to use) are the following:
-
aside – Similar to a Facebook note update.
-
gallery – A gallery of images.
-
link – A link to another site.
-
image – A single image.
-
quote – A quotation.
-
status – A short status update, similar to a Twitter status update.
-
video – A single video.
-
audio – An audio file.
-
chat – A chat transcript.
Those of you familiar with Tumblr may recognize this approach to post formats.
For the most part, post formats are designed as a way to style a site (and customize styling depending on the kind of content that is being displayed). They have no special functionality, and their use depends entirely upon the theme you are using. Many older themes, for example, do not recognize post formats.
Reading Settings – Front Page
WordPress is a very flexible platform for creating full-blown websites, not just blogging sites. This page will show you how to change the “front page” of your website.
As we have said before, WordPress provides two primary content types for you two work with: posts and pages. Posts, as in blog posts, are a somewhat complex form of webpage. Each blog post gets published in reverse chronological order, on the front page of a WordPress site. You write a new post, and it gets published at the top of the front page. Pages, are a more static form of content. They are additional areas to put information that doesn’t change much. So what if you would like to make the front page of your WordPress site based on a page instead of your blog posts?
- Start at the Dashboard.
- Navigate to Settings > Reading.

- Normally, the front page displays your latest blog posts. What we want to do instead is select a Page from the website. Obviously this page has to exist before you can select it. Select the “A static page” radio button and choose the About page from the Front page drop-down menu (an About page was created for you when you installed WordPress). Press the Save Changes button and now you will have the “About” page as your Front page. Edit it as you see fit and provide a good welcoming page for your visitors.
- But wait. What will happen to your blog posts? Most people will want them as the “dynamic” part of your site. First, create a new Page.

- Title it Blog (you can title it whatever you want but Blog is common and descriptive). Leave the page blank (don’t type any text in the edit box) and Publish it.

- Now go back to Settings > Reading. Under the static page area choose Blog from the Posts page drop-down.
- Click the Save Changes button. Now your “home” page will actually display the About page. You will also have a Blog item in your menu (depending on your theme, you may have to customize your page display to see pages).
- If you click on the Blog menu item, you will then see your blog posts. Notice the /blog added to the web address.
Permalinks
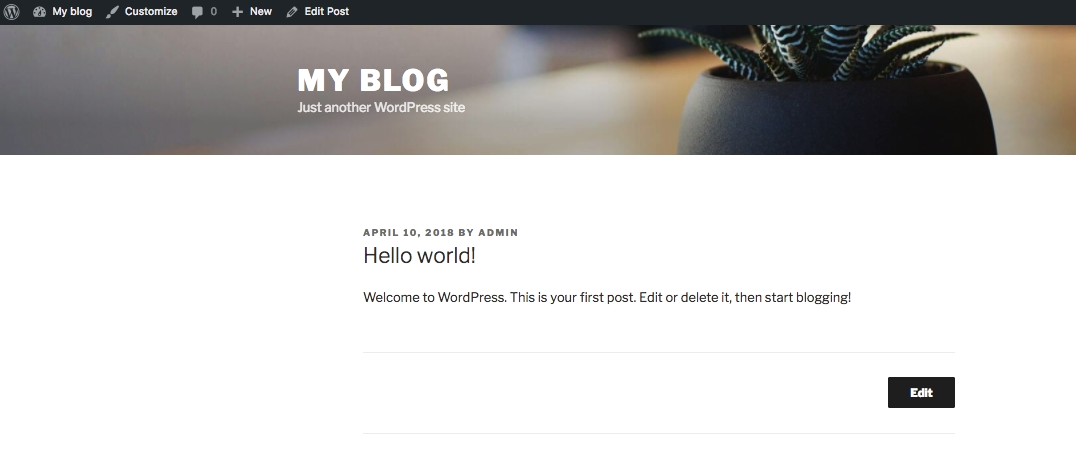
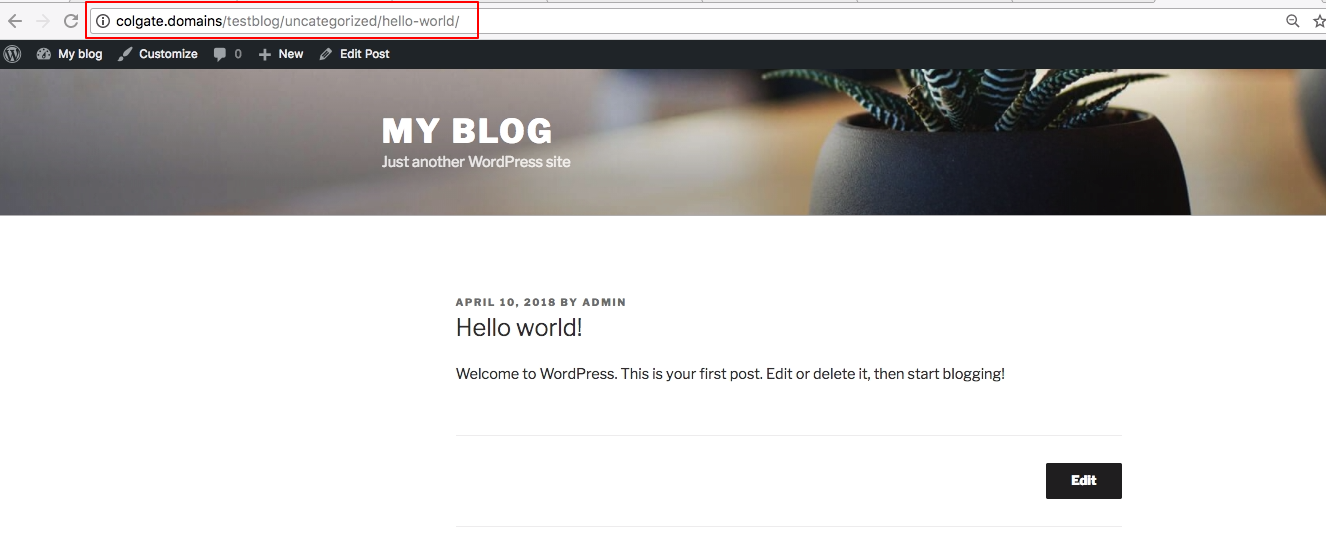
Part of the popularity of WordPress is how easily it makes a website functional and yet attractive. One of the smaller details that you might want to adjust is how the addresses to your blog posts are structured. Permalink is the name given to the address of an individual blog post because they are “permanent links”. For example, the web address for this sample blog is “http://colgate.domains/testblog”. The link to the first post, titled “Hello World” may be structured in many ways. The screenshot below shows one way: “http://colgate.domains/testblog/uncategorized/hello-world”.
With WordPress, you have many options to form the links to posts, and you can change them to work for your particular content.
- To change the permalink structure, start by going to the Dashboard.
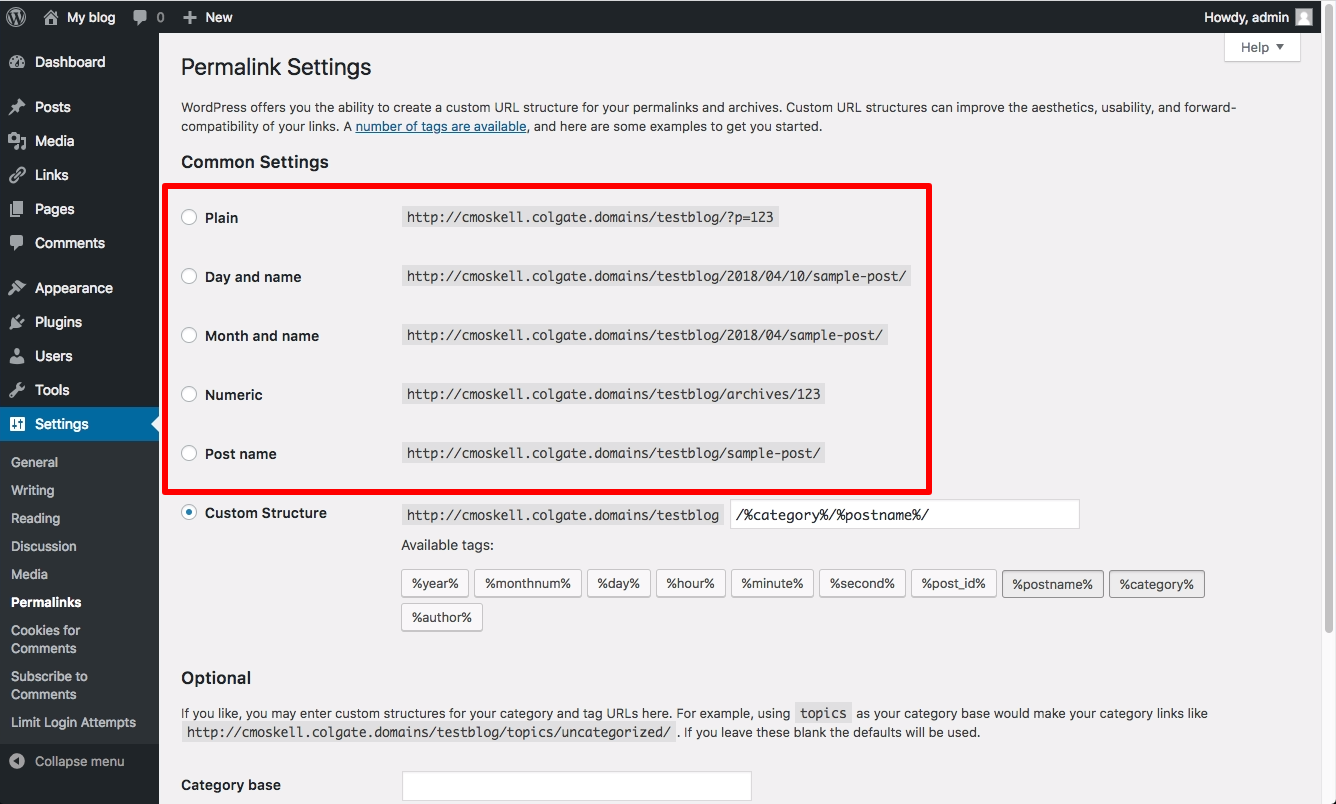
- Next, go to Settings > Permalinks. By default, your blog will use a “custom structure” that includes a category select and the name of the blog post.
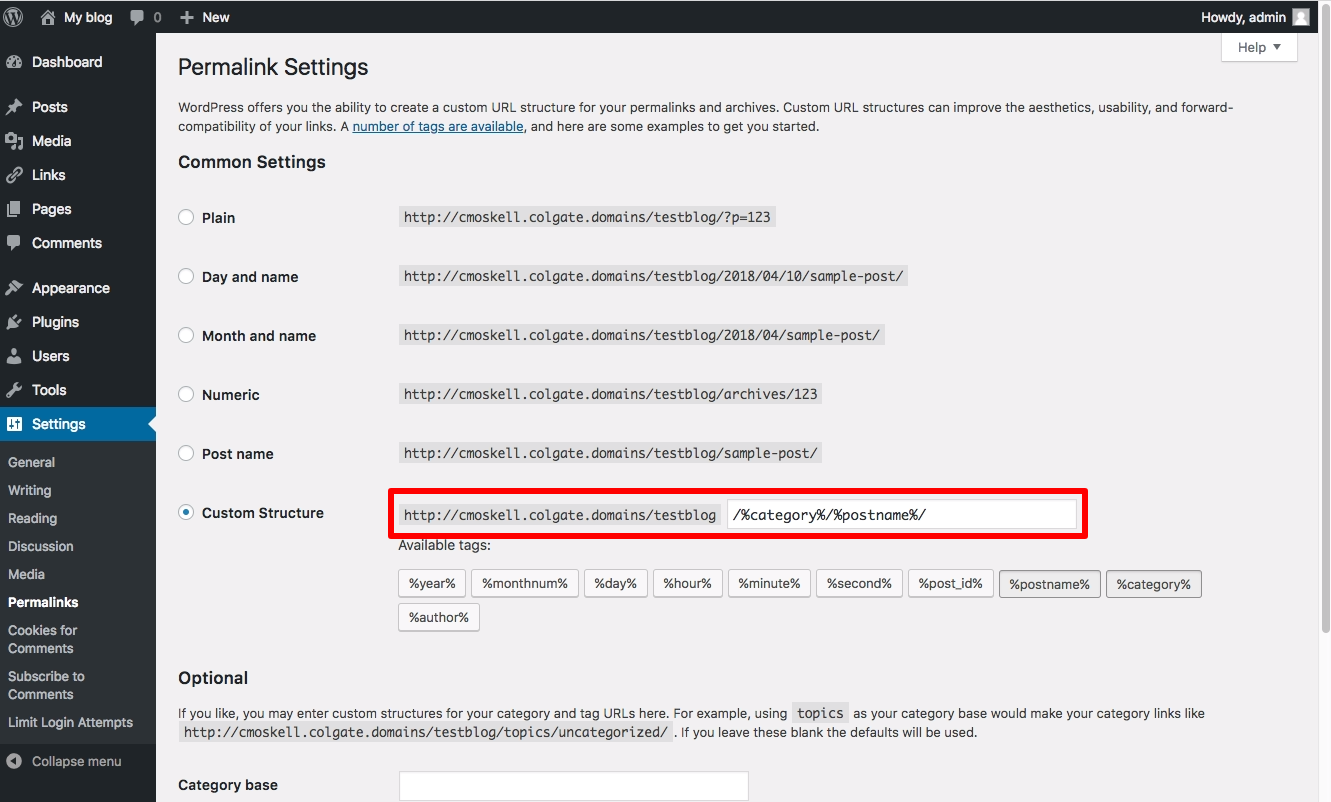
- If you are not using categories, or prefer a different look to your blog post addresses, there are several choices under Common Settings. A popular choice is to use the Post name choice, which is a bit more informative. So our post titled “Hello World” will have an address of “http://sstrauss.colgate.domains/blog/hello-world”.
- If you want to have the date as part of the address, you can choose Day and name or Month and name. You can also change the structure of category and tag names under the Optional section.
- Finally, when you write a blog post, you have the option of editing the permalink for an individual post. Just click the Edit button (underneath the Title field).

- Then type in whatever is appropriate (and hasn’t been used yet). Generally you want to make it as simple and short a word, or words, as makes sense.
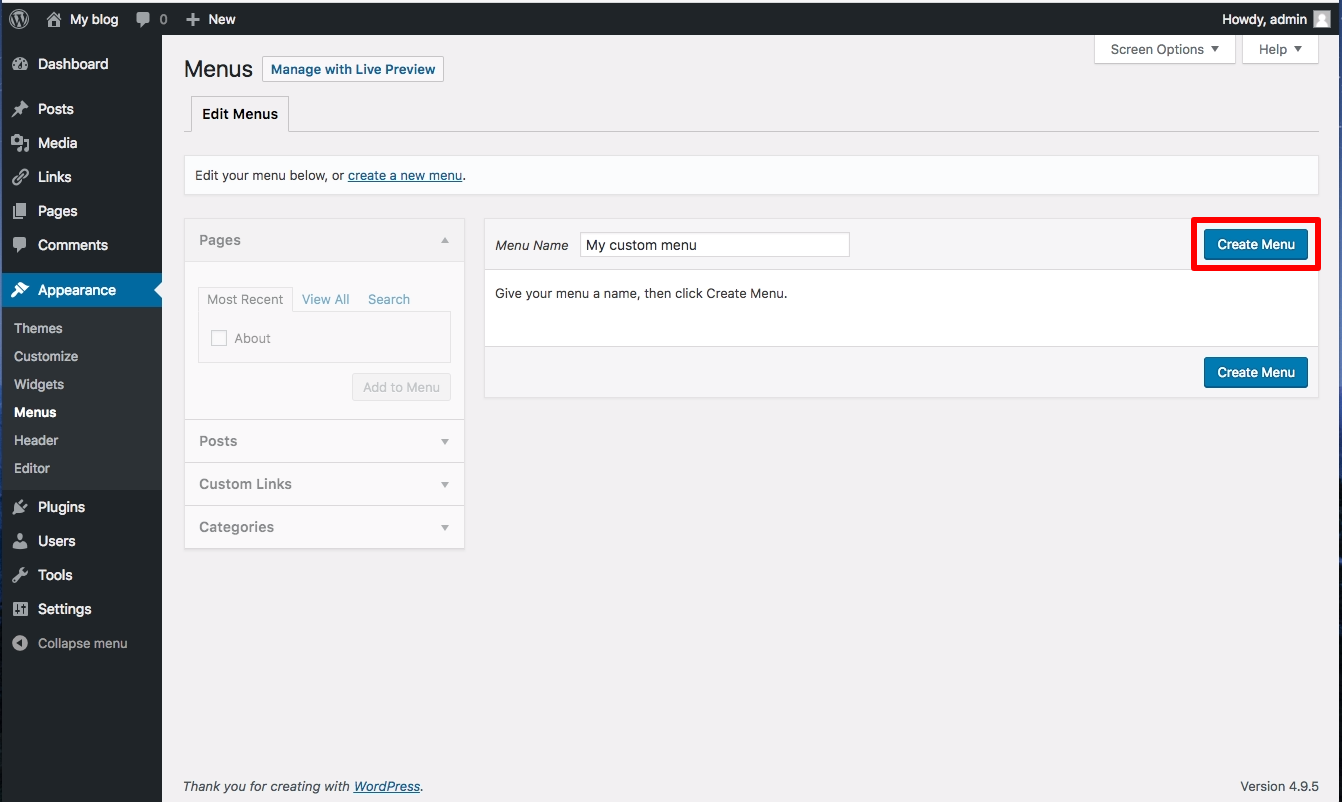
Building Your Custom Menu
- Start at your site’s Dashboard and choose Appearance the Menus.

- In the Custom Menus interface that appears, type a name for your menu. This can be anything you want. It doesn’t get displayed anywhere; it’s used by WordPress to identify and place your menu. Once you’ve typed the name, click Create Menu.
- You’ll now be presented with a screen that includes a section titled Menu Settings. This is where you’ll indicate where you want your menu to appear in your theme. The number of locations available depends entirely upon the theme you choose. In the example shown below, there are two areas available; we’ve chosen to place the menu in the Top primary menu area which we know corresponds to the header menu. You may need to experiment a bit in order to find out where your menu will appear in your theme. You can always change this location later by coming back here and clicking the Manage Locations tab.
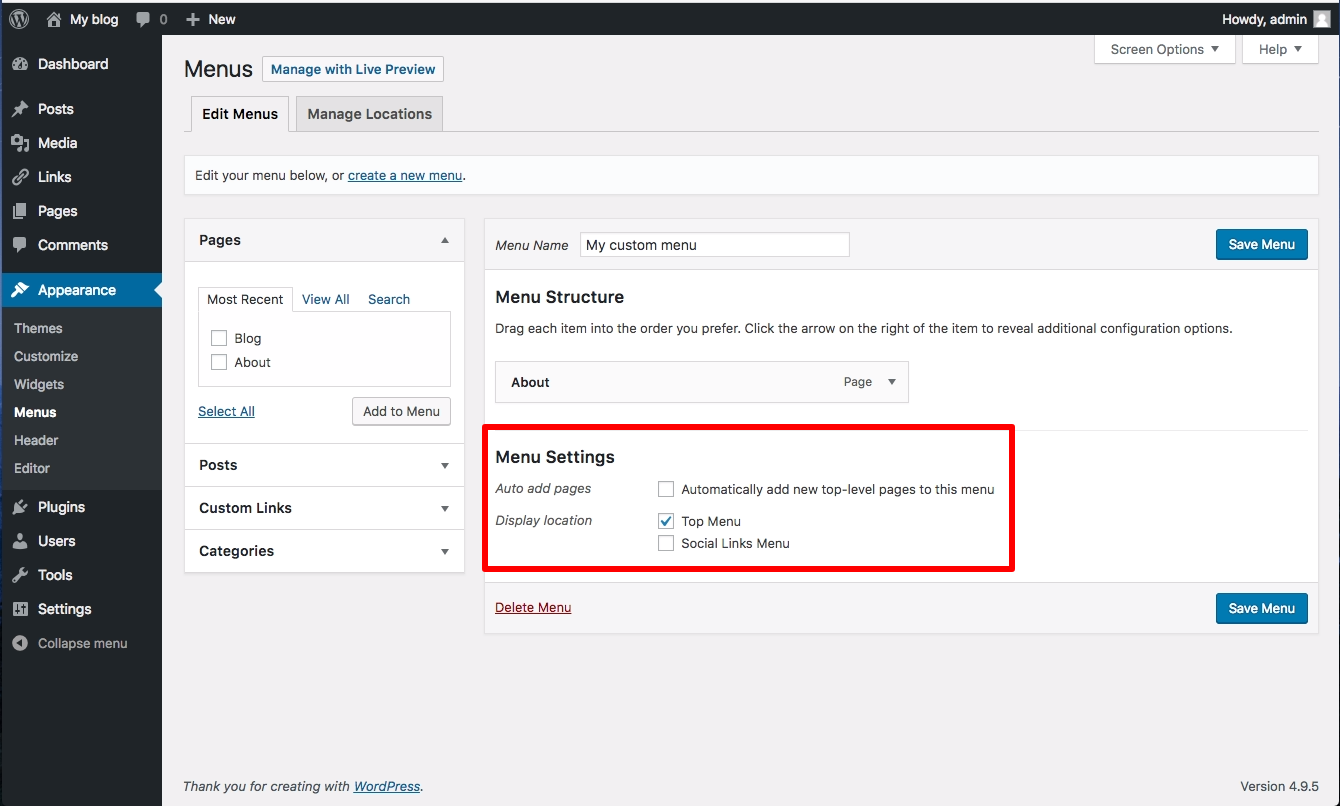
- Now that you’ve set up your menu and assigned it to a location, you can begin to add links to it. On the left-hand side of the screen, you’ll see what content is available to add. On the right-hand side of the screen, in the Menu Structure area, you can arrange and organize your links.
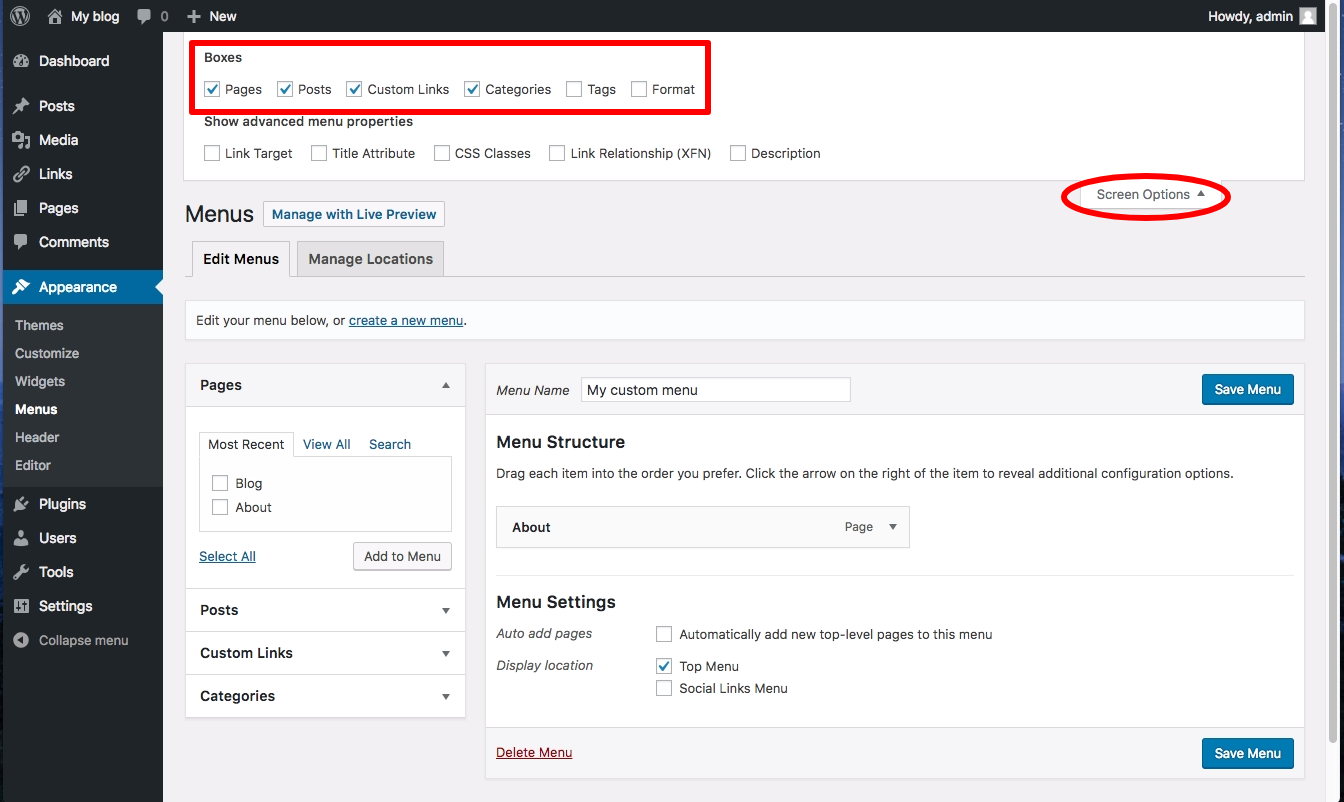
- By default, you may not see everything that is available to you to add to your menu. For example, posts can be added to menus, but they’re not usually displayed by default. To make more content available, click the Screen Options tab at the top of your WordPress screen, and then click off the check boxes that correspond to additional content.
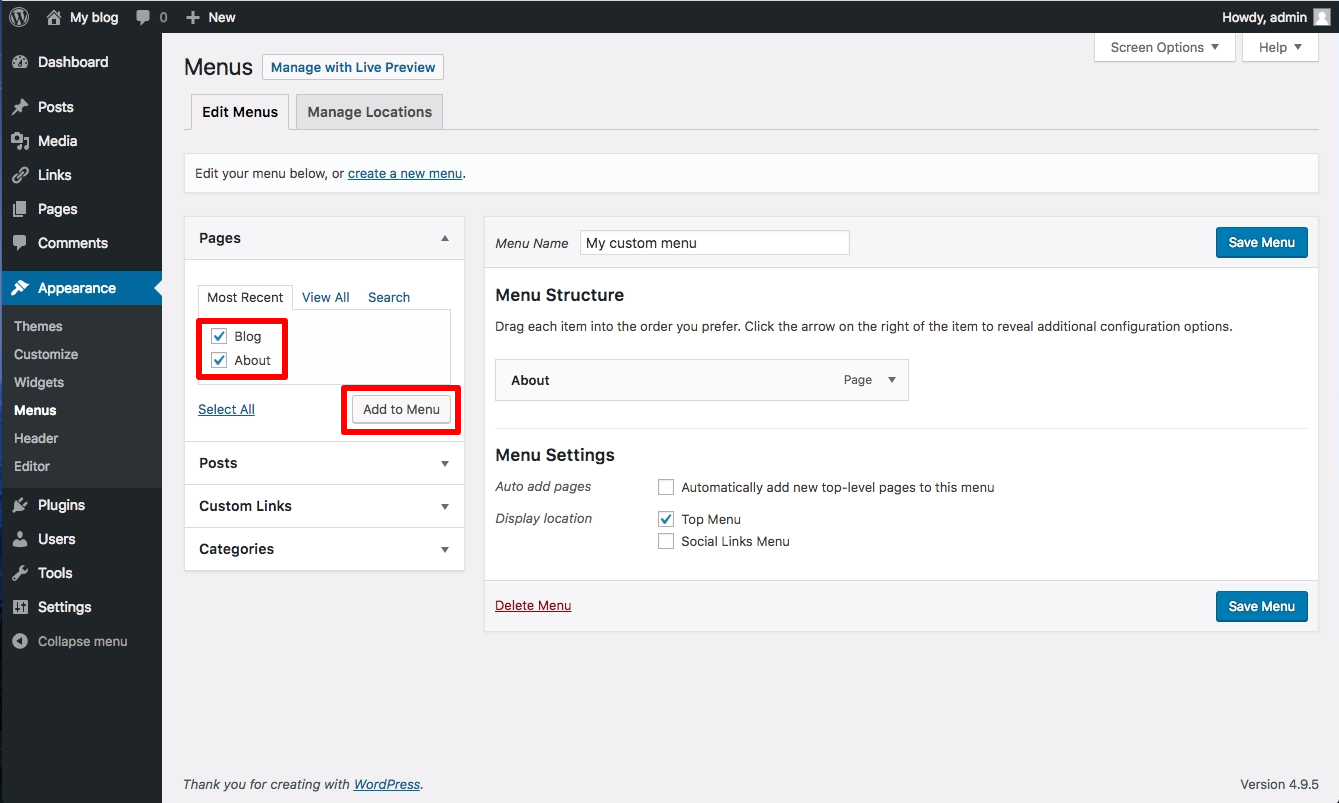
- To add content to your menu, simply check it off on the left, and click the Add to Menu button.
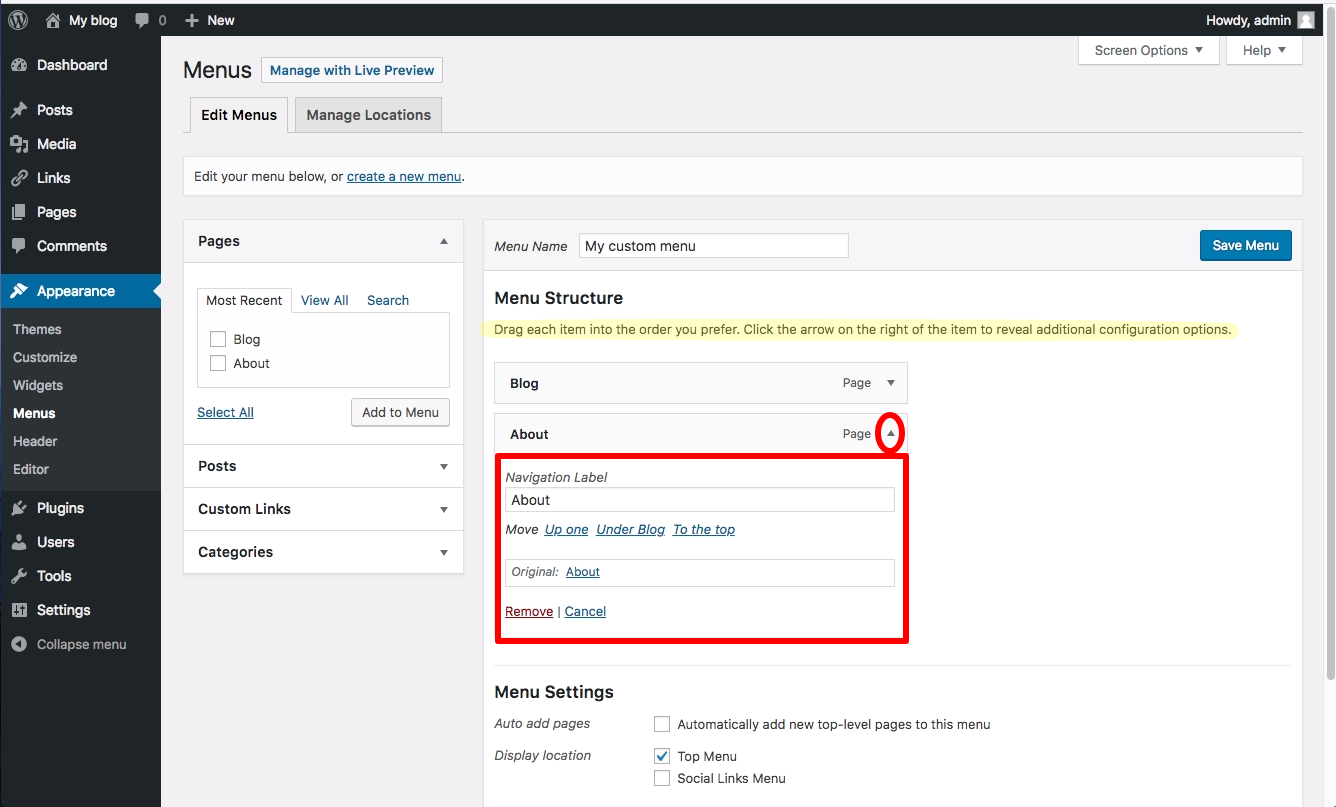
- Your new content will appear on the right, and you can drag items in the order you want them to appear. Drag items to the right to indent them under other items. This will usually make them appear as drop-down items in your menu.
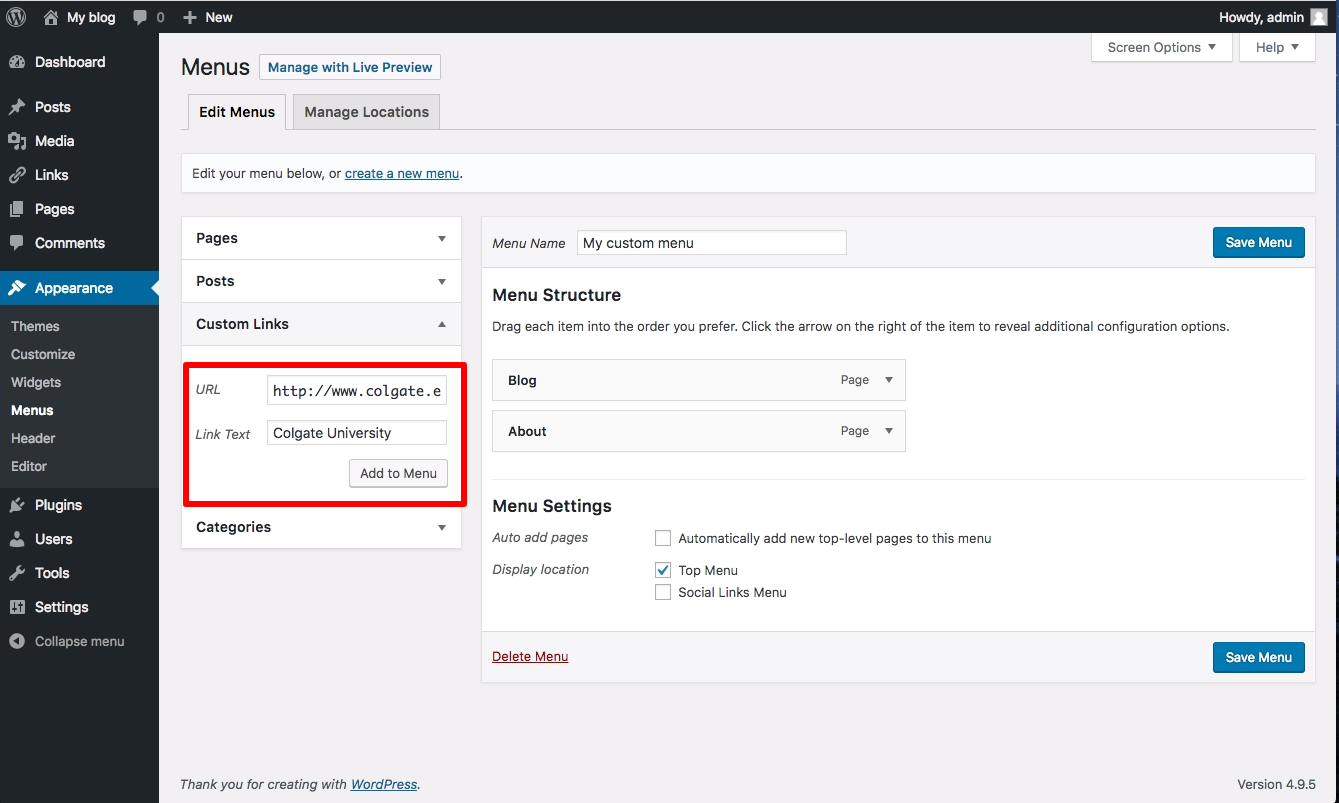
- You can add custom links to your menu by clicking the Links section on the left. In the short form that appears, enter your link’s URL, and a text for the link. Click Add to Menu to move it to the left.
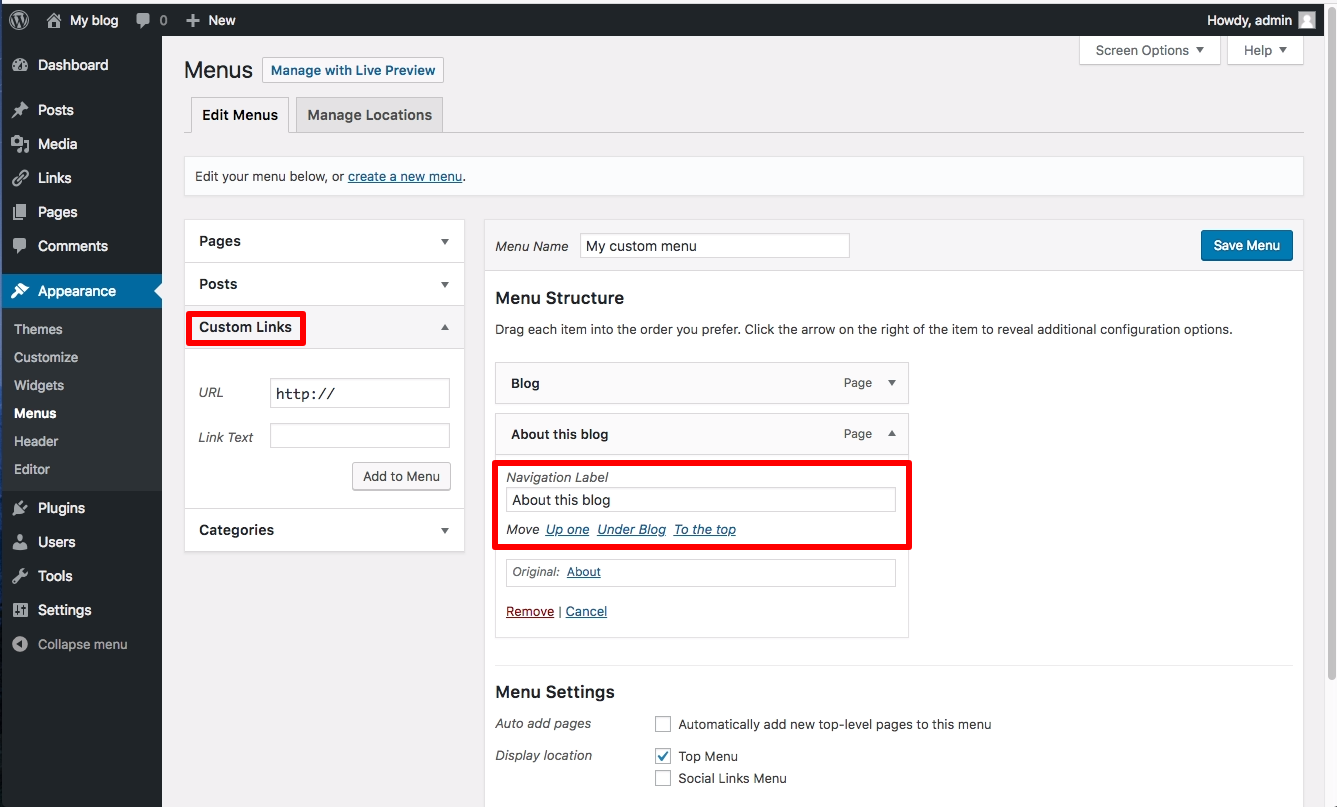
- Note that you can change the link text of any item you add to your menu. This can be helpful if you have a page with a long title, and you’d like the link to not take up so much space. You can abbreviate the title in the Navigation Label section, and that shorter text will become the actual menu link.
- When you are done, make sure you click Save Menu.
Other Notes about Menus
When you add a Category or Tag to a menu, the link will take your readers to an archive of all the posts on your site that use that category or tag. This can be a very useful feature for organizing your content when you’re using posts to share your work.
In addition to assigning Custom Menus to theme areas, there is a default Custom Menu widget that you can put in the sidebar of your site. This is useful for creating smaller, customized navigation for your site.
If you forget to click Save Menu after making changes to your menu location or content, you will lose your work!
WordPress Widgets
Widgets are a more advanced feature of WordPress that allow you even more control over the content on your site. In essence, widgets are small containers of content that can be placed in various areas of your site. Where you can place widgets depends entirely on the theme you are using. Many (most) themes include at least one “sidebar” into which you can place widgets. Some themes include additional “widgetized” areas. The best way to find out what areas are available to you is to go to Appearance > Widgets and take a look at the areas listed on the right. Each widgetized area will appear as a box on the right. In the example show below, the theme contains three widgetized areas: Primary Sidebar, Content Sidebar, and Footer Widget Area.

On the right, you will see a number of widgets available to you. WordPress comes with some default widgets. Other widgets might become available when you have a particular theme activated. Finally, some plugins provide additional widgets to you.
Widgets can present all different kinds of information. The simplest widgets allow you to add text to your site. But you’ll also find widgets with many options that you can set to display dynamic content or to interact with other services. Below is a list of the default widgets available in WordPress.
When you’re ready to start using widgets, all you need to do is drag them from the right-hand side of the Widgets interface into the boxes on the left. WordPress will immediately save them, but you may need to set some options
Default Widgets
-
Archives: Shows a monthly listing of your posts.
-
Calendar: Shows a calendar view of your posts.
-
Categories: Shows a list of all of the categories on your site.
-
Custom Menu: Shows a custom menu that you’ve set up with WordPress’ Custom Menu interface.
-
Links: Shows your links.
-
Meta: Shows links to your RSS feed and your login.
-
Pages: Shows a menu of all of your pages.
-
Recent Comments: Shows the most recent comments on your posts.
-
Recent Posts: Shows your most recent posts.
-
RSS: Allows you to show content from an RSS feed.
-
Search: Provides your users with a search box.
-
Tag Cloud: Shows a “cloud” of the tags/categories on your site.
-
Text: Shows whatever text you enter.
-
WordPress Plugins
WordPress has a lot of functionality built-in, but occasionally you might find a specific need that isn’t a part of the default software. To accomplish this, WordPress has a plugin architecture where developers can create plugins that add additional functionality to your site. From simple photo galleries to site statistics, to automatic Twitter and Facebook sharing of posts, there is practically a plugin for whatever you need for your blog (over 23,000 at the time of this writing). To start using and installing plugins just follow these simple instructions:
- Log in to your WordPress dashboard.
- From the left side menu locate and click plugins.
- You will be given a list of all your currently installed plugins.From this menu you are able to activate and disable specified plugins by using either the single plugin options located under each plugin name.- Or you may use the bulk action drop down menu to simultaneously activate/disable multiple plugins by checking desired plugins- Additionally you may also sort through installed plugins using the sorting options above the bulk action menu.
-
To install a new plugin click “add new” either from the plugin sidebar or the main plugin menu, you will then be redirected to a search engine where you can search using general or specific terms to find plugins. – For example searching “photo gallery” brings up various plugins from different developers.
Once you find your desired plugin to install it hit “install now”, which will automatically install the plugin and prompt you if you would like to activate it now or return to the menu.

After installing your plugin be sure to visit the developers’ website if you have any additional questions about how the plugin works, as some plugins may require certain codes or other actions to be used properly.
Some plugins will have their own settings page located under the 'Settings‘, other plugins will break out their own menu item on the lefthand side of the Dashboard. The best way to understand how to use a plugin is to make sure you’ve read the documentation available on the plugin’s website as every plugin behaves differently and sometimes it won’t be explicit how the plugin interacts with your website.
Basic Privacy
WordPress is a platform intended to allow you to share your thoughts and ideas freely and easily with the world. However, there are options to publish to a more limited audience.
The first way is to limit who can find your website. That is done by keeping search engines, like Google, from seeing (known as indexing) your site.
- To do this, we’ll start at the Dashboard.
- Navigate to Settings > Reading.Normally the box next to Search Engine Visibility is unchecked. If you decide to check the box, it will “Discourage search engines from indexing this site.” It will depend on the search engine to honor your “request”. Some search engines will simply ignore it. Obviously this is not a sure-fire way of keeping your blog private.

- You also have options on individual posts to keep them private, so that only people who are logged in to your site can view a given post. You can also password protect posts with a password you supply. Choose the Private radio button to keep a post hidden behind the login, or choose the Password protected button and then type in the password you wish to use. Click on OK when you are finished. Then be sure you click the Update button to save your post with the new settings.

Discussion Settings
What makes WordPress a powerful platform is that not only can you create a dynamic website, but you can also allow dynamic discussions about the content with your visitors. Comments, the bread and butter of the discussion, can add to the overhead of your website management. You have to keep up with responses to your commenters or they will think you aren’t paying attention. Comments also can come, unfortunately, in the form of Spam. We will give you some additional information about dealing with Spam in another section. For now, here’s how to manage your Discussion Settings.
- Start at the Dashboard.
- Navigate to Settings > Discussion.

- The two main forms of discussion on a website are “Allow link notifications from other blogs (pingbacks and trackbacks)” and “Allow people to post comments on new articles”.
- Comments are self-explanatory. People come to your website, read an article, and as long as you allow comments, people can write whatever is on their mind. Commenters must leave their name and email address (if you leave that setting checked). You can also require users to be registered to your site to comment. They would then need to be logged in to submit any comments. By default you will get an email sent to the admin account of the WordPress site when someone posts a comment, or when a comment is held in moderation. You can uncheck those boxes if you do not wish to receive those emails.
- A comment will appear on the article (post or page) only after you approve it. If you have approved a comment author once, they will be automatically approved the next time they leave a comment on your site. If you uncheck the box labeled “Comment author must have a previously approved comment”, then all comments will appear automatically. We don’t recommend this setting.
- You also have some control over comment moderation regarding how many links a comment contains (spammers like to put links in their “comments”). You also can filter out words, URLs, email addresses, to hold them in moderation. You can then approve them, spam them, or trash them.
- There are also forms of discussion called link notifications. Spammers like these too. Here’s an article on the What, Why, and How-To’s of Trackbacks and Pingbacks in WordPress.
- Sometimes it’s nice to have visual representations of the people who are commenting on your blog. These are called Avatars and can be found under Settings > Discussion.
WordPress uses a common universal system of avatars called Gravatars (Globally Recognized Avatars). The system requires you to sign up with your email address. You can upload a graphical representation of yourself (a picture or other graphic). From then on you are identified with your Gravatar on any blog that you use that email address with.
In the WordPress Discussion Settings, you have a few options. Whether to show Avatars at all, the “rating” allowed to be shown, and what the default Avatar will be if a user does not have a Gravatar.
Managing Comment Spam with Akismet
SPAM! Everyone hates it in their email. If you’re new to WordPress and blogging platforms, spam exists in the form of comment spam – people (or vermin) leave comments promoting their services or schemes, on a post or page.
So how do you deal with comment spam when it can come in even more often than email spam? Do you have to delete every comment that comes in? Well, the answer to the second question is “no”, and the answer to the first question is, with a plugin called Akismet.
- To get started we need to install a plugin. To do this, we’ll start at the Dashboard.
- Navigate to Plugins > Installed Plugins.

- At or near the top of the list of plugins that are automatically installed in a new WordPress installation, is Akismet. It is not activated, so part of the process of getting Akismet is Activating the plugin. Before you activate it, however, you need to get something that will be somewhat strange for most people. It’s called an API key. API stands for Application Programming Interface, and it’s a way for programs and services to “talk” to each other. The Akismet plugin requires you to get an Akismet API Key, which is simply a “code” that you supply when activating the plugin. The key is free if you use it on a personal WordPress installation, and it’s available on the Akismet website.

- Once you arrive on the Akismet for WordPress site, click the Get an Akismet API key button.

- If you have an account at WordPress.com you can sign in with that login and get your key. Otherwise, fill in an email address, a username, and a password to use for a new account. Click the Sign up button to proceed.

- Type in the URL of the site you’ll use Akismet on and click on the Sign Up button under the Personal plan (that is if you want it to be the free version).

- When you get to the next page, the recommended contribution is $36. You can adjust the slider down to $0. The smiley face will begin to frown, but at least your key will be free.
Also fill in your name and click Continue.

- You’re finished with the sign up process for your key, and it will be displayed on the page for you (we’ve blurred ours out).

- Now follow the steps that they show you for using your new key. You will enter the key in either the Akismet area under Plugins or JetPack (if you have that installed).

4.2.Omeka
Installing Omeka
Omeka is an open-source web application that can be used to create and display online digital collections. Developed by programmers at George Mason University, Omeka was designed to be user-friendly, both during installation and setup and during daily usage. To install Omeka, use these simple steps:
- To get started you’ll need to login to your control panel (https://colgate.domains/dashboard) using your Colgate username and password.
- Once logged in you’ll be at the homepage of your control panel. Navigate to the Web Applications section of the cPanel and find Featured Applications. Then select Omeka.
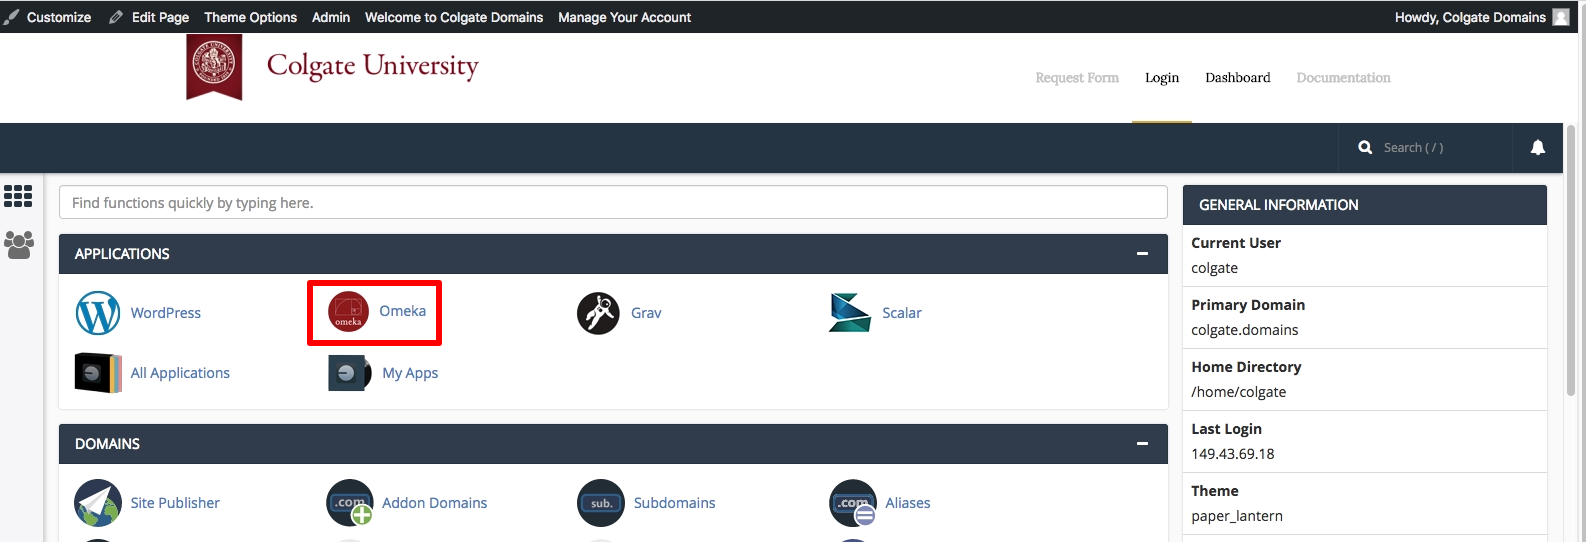
- This page gives you more information about the Omeka software. To begin the install, click install this application in the upper-righthand corner.
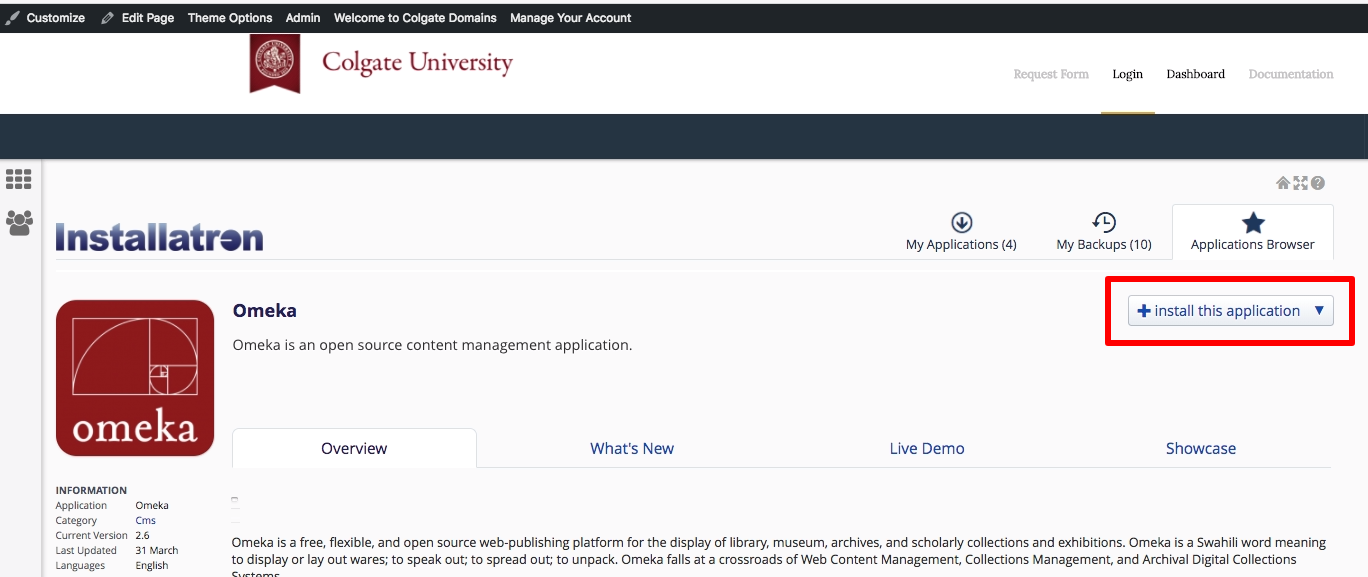
- On the next page, the installer will ask for some information about this install. The first thing you’ll want to do is decide where to install it. If you’re wanting to install Omeka on your main domain, you can leave the directory area empty. If you created a subdomain, you can select it from the dropdown menu. You also have the option of installing Omeka in a subfolder by typing in the folder name in the Directory field. Click here for more information about subdomains and subfolders.
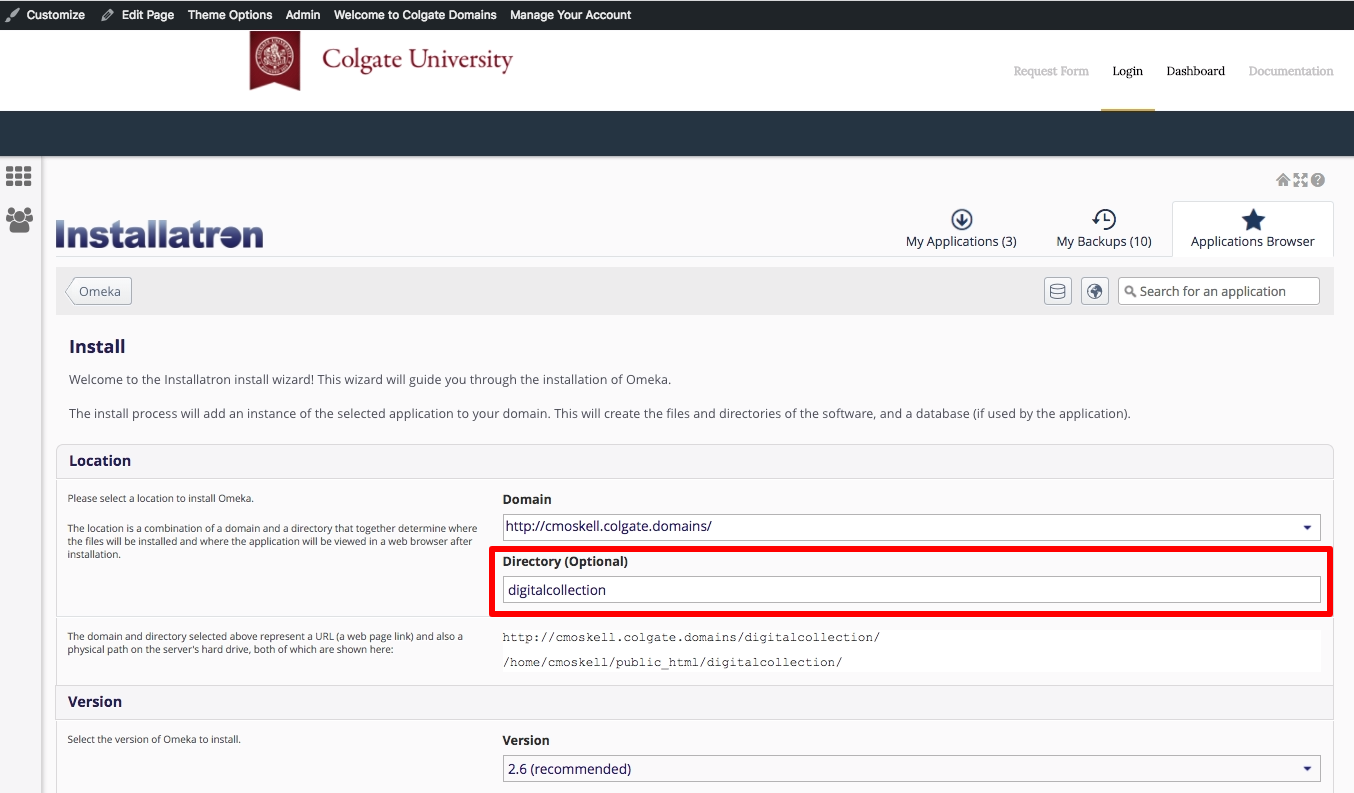
- Scroll down to the next Setting section. Set a Adminstrator Username and Administrator Password. You will need this again shortly.
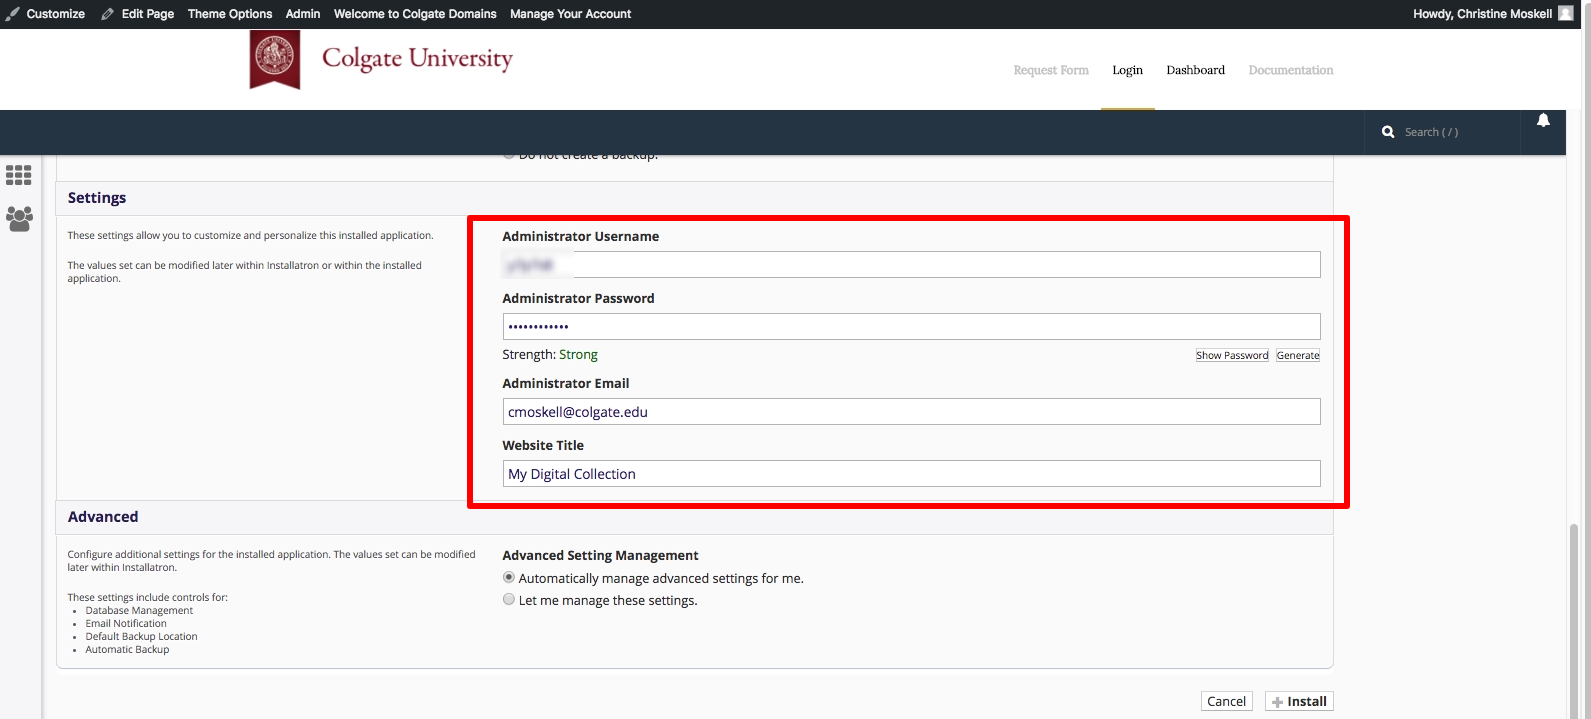
- By default the installer will automatically backup your website and update it anytime a new version comes out. While we recommend you keep this option, it is possible to only do minor updates, or turn them off completely. The installer will also create a database for you automatically, but if you’ve already created one for this website you can choose Let me manage the database settings and enter the details. Click Install to continue.
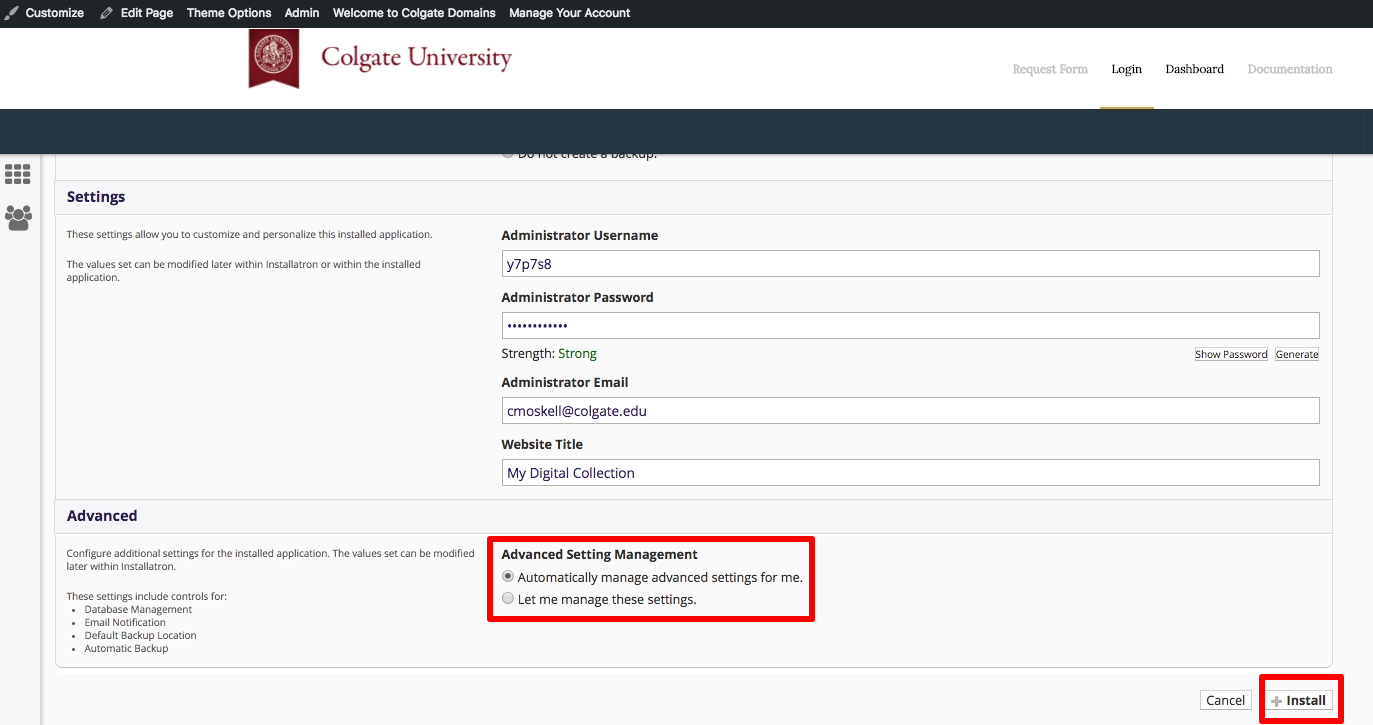
- The installer will take just a few moments to install Omeka and a progress bar will keep you updated. When it is complete you will see a link to your new Omeka site (see the first URL below) as well as a link to the backend administrative section for your Omeka site (see the URL on the second line below). Click the Omeka Admin link to configure your new Omeka installation.
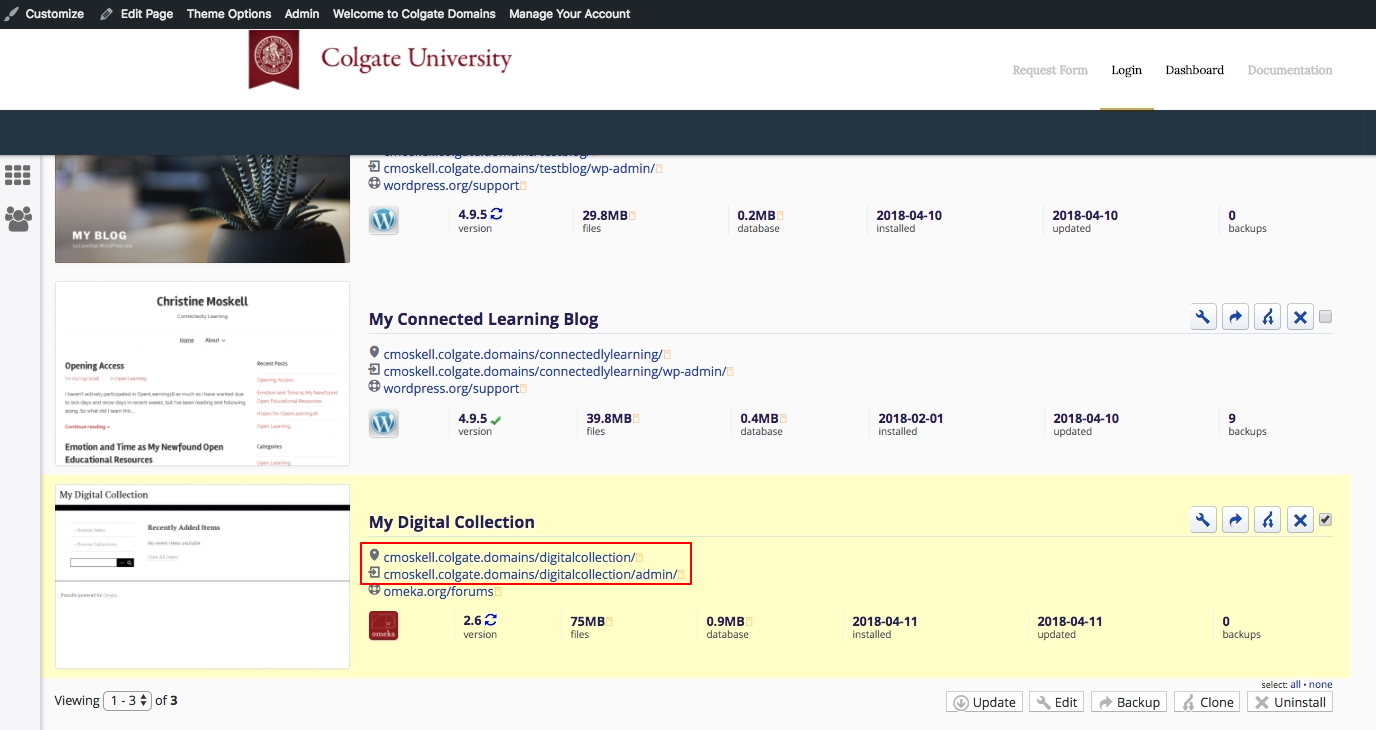
- When you visit your new Omeka Admin link, you are asked for the admin username and password. Enter the Username and Password that you set for the administrative superuser (i.e. yourself).

- Begin adding content in the Admin Dashboard. You’ll find lots of instructions, tips, and ideas on the Omeka.org documentation site.

Installing Plugins
There are a variety of plugins that enable additional functionality in Omeka, but in order to easily add them, you will first need to install Escher, a plugin installer. All the plugins available for Omeka and their descriptions can be found on this page.
- Find the Escher plugin listing at omeka.org/add-ons/plugins/ and click the red button on the right to download the Escher zip file. Make sure that you have the downloaded .zip file on your computer. Some browsers may automatically extract the folder. If that happened to you, and you do not see the original .zip file, right-click on the folder and compress it back into a .zip archive.
- Next, open up your cPanel Dashboard and click on the File Manager. You can find the File Manager under ‘Files’ or by typing “File Manager” in the upper right search bar.
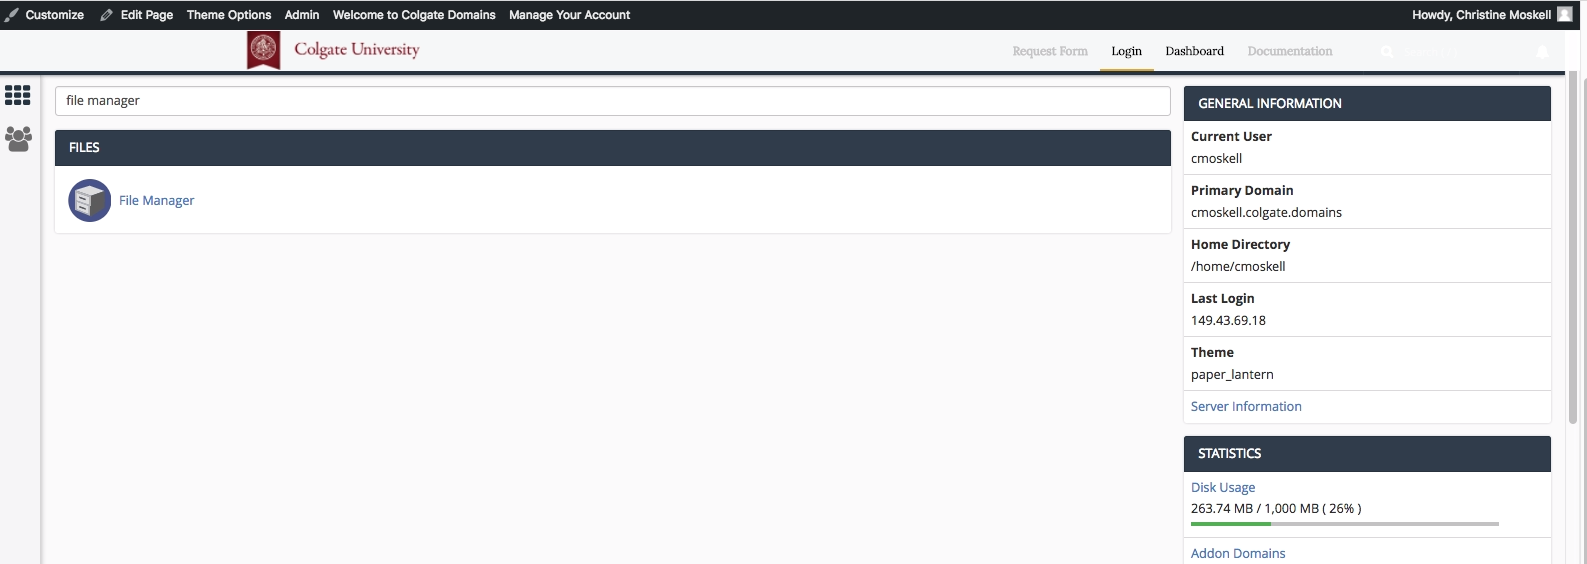
- Go to the public_html > omeka > plugins folder by clicking on the folder icons in the file menu, or by typing “public_html/omeka/plugins” into the navigation bar at the top and clicking ‘Go’.

- Next you will need to upload the Escher zip file you downloaded into the plugins folder. Select the Upload option in the top menu.

- Upload the zip file. When the upload is complete, click the ‘Go back to home/yourdomain/public_html/omeka/plugins’ link at the bottom of the page to return to the File Manager.
- You will see that the Escher zip file has appeared in the plugins folder. Make sure the Escher zip file is selected (it should be highlighted in blue), then click Extract from the menu at the top of the page. A small window will open up to confirm where the file will be extracted to. If you were in the plugins folder, it should say public_html/omeka/plugins, if not, type that into the box before you hit Extract File(s).

- Another window will open that outlines the contents of the file. Just hit the Close button and the installation will be complete.

- Confirm the new Escher directory is there, and delete your no longer needed Escher.zip file.
- The Escher plugin should now be available in the plugins tab in your Omeka. To use Escher to install other plugins, click on Escher in the left hand sidebar.
- Escher is installed! You should see it in your dashboard menu.

- You can now select and use this plugin to manage other plugins.

Using Omeka
You can learn how to use this application in the official Omeka Support Documentation. This support guide will help you get started and begin creating your Omeka site.
4.3.Scalar
Scalar is a content management system with the idea of creating non-linear books on the web.
Installation
- To get started you’ll need to login to your control panel (https://colgate.domains/dashboard) using your Colgate username and password.
- Navigate to the Application section and select Scalar. You can also use the search function as well.

- When you click on the Scalar icon, you will be taken to the Scalar information page. Click install this application.
- On the next page, fill in the different sections. First in location, decide on the domain or sub-domain for your Scalar site. You can create a sub-domain by following directions in the section Setting up Subdomain. The directory is optional. If you are using a sub-domain, you may not need to use a sub-directory. You can learn more by reading Subdomains vs Subdirectories.
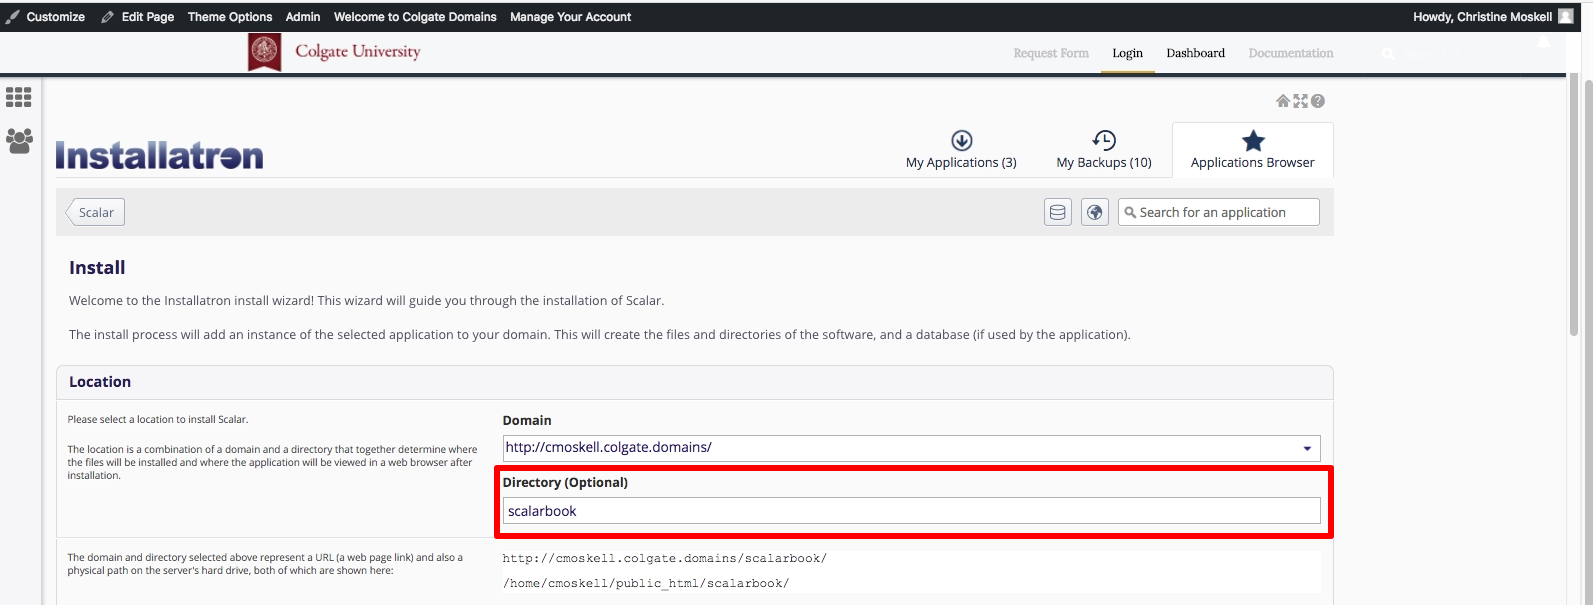
- In the version section, select to most recent version. By default the installer will automatically backup your website and update it anytime a new version comes out. While we recommend you keep this option, it is possible to only do minor updates, or turn them off completely. The installer will also create a database for you automatically, but if you’ve already created one for this website you can choose Let me manage the database settings and enter the details.
- Finally, in Settings, you’ll need to create a username and password for the Scalar install. A password can be generated for you, but you should try to create your own. Enter that information in the inal section and click Install.
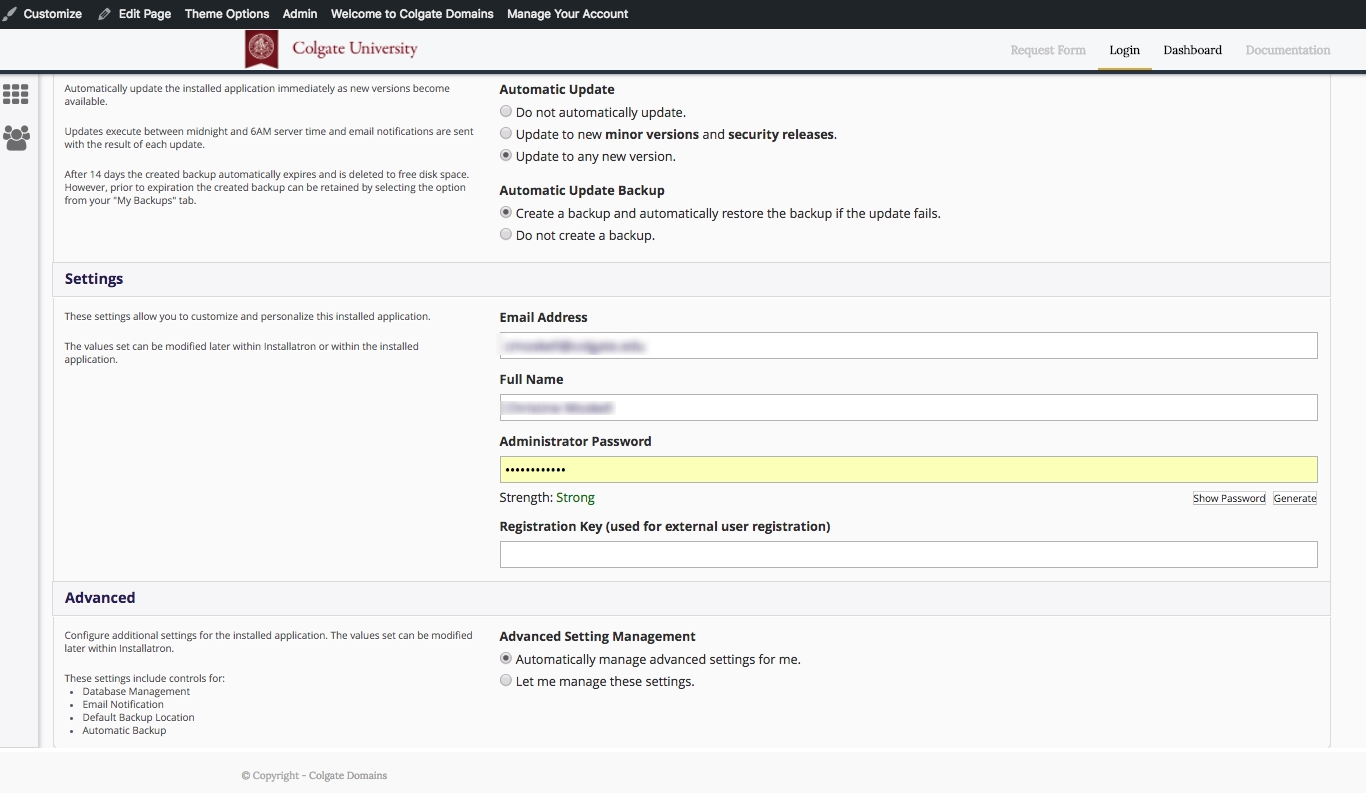
- Once the installer is finished loading, you will be taken to the My Apps section of the dashboard. Here you’ll find links to login to your scalar installation.
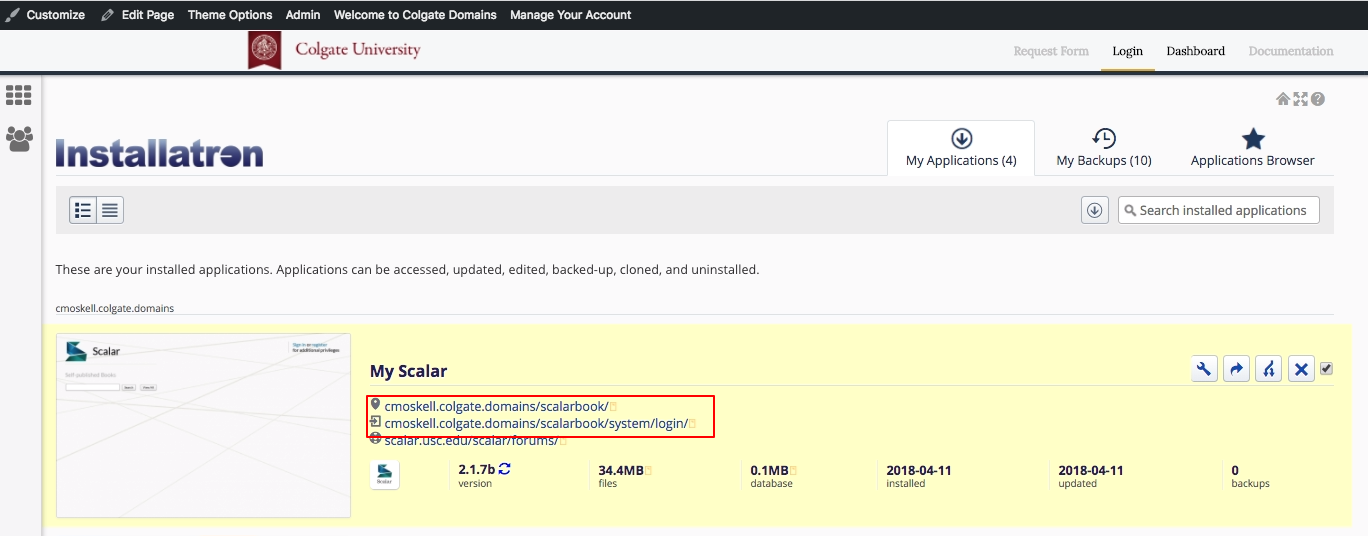
Creating a book
To get started in Scalar, you will need to create a book.
- Go to your Scalar site via the My Apps link or the Scalar URL you established during the setup process.

- Log in to Scalar using the username and password you set up during the installation process.

- Go to the top right corner and click, Dashboard.

- Select the My Account tab and at the bottom of the page type in a title for you book. Don’t worry this title can be changed later if needed. Click Create.

- You now see your book in the “My books” list. From there you will be able to build your Scalar book.
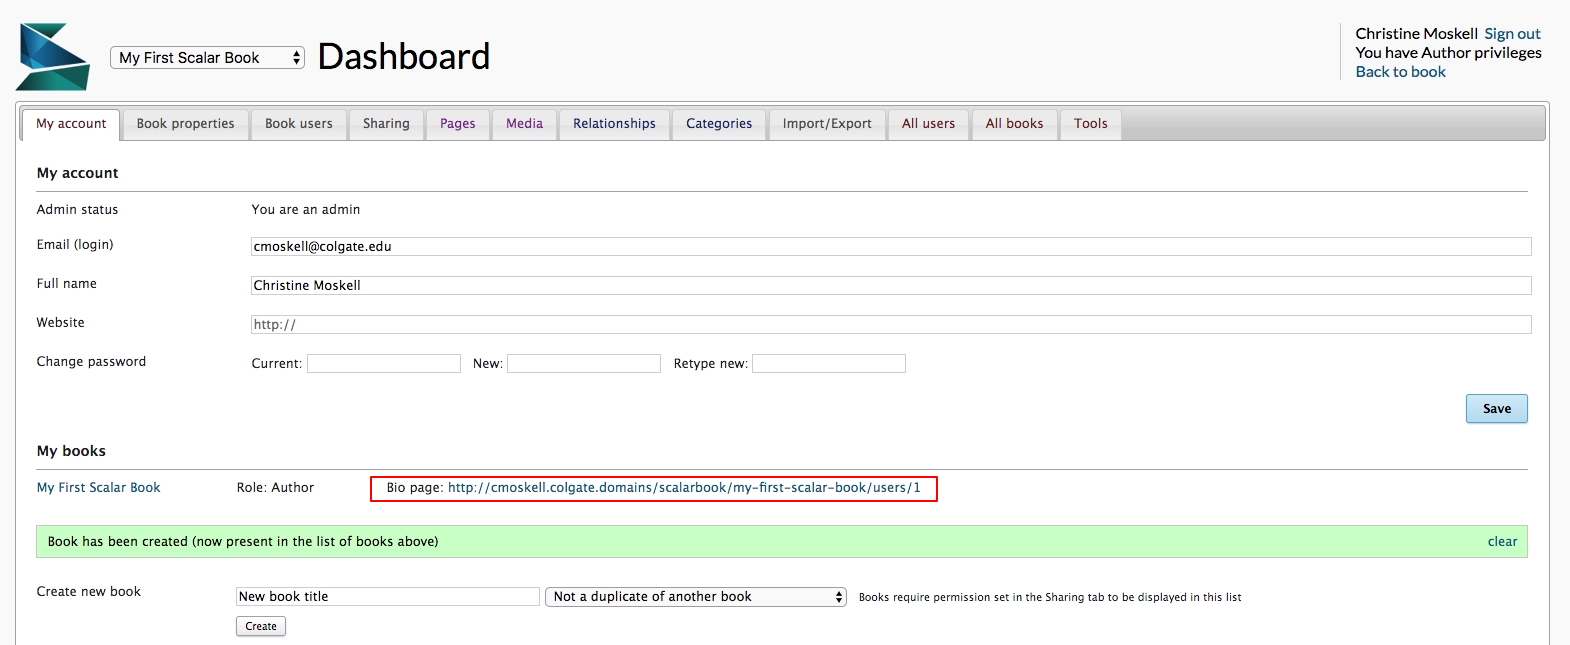
We recommend visiting the Scalar guide (http://scalar.usc.edu/works/guide/index) and the Scalar forums for more support information (http://scalar.usc.edu/scalar/forums/).
4.4.Mediawiki
MediaWiki is an open-source publishing platform that can be used for creating a collaborative document repository. It’s the software that drives the Wikipedia website. Setting up a MediaWiki install on your own domain can be done by following these steps:
-
To get started you’ll need to login to your control panel (https://colgate.domains/dashboard) using your Colgate username and password.
- Once logged in you’ll be at the homepage of your control panel. Navigate the Applications section of the cPanel and click All Applications.
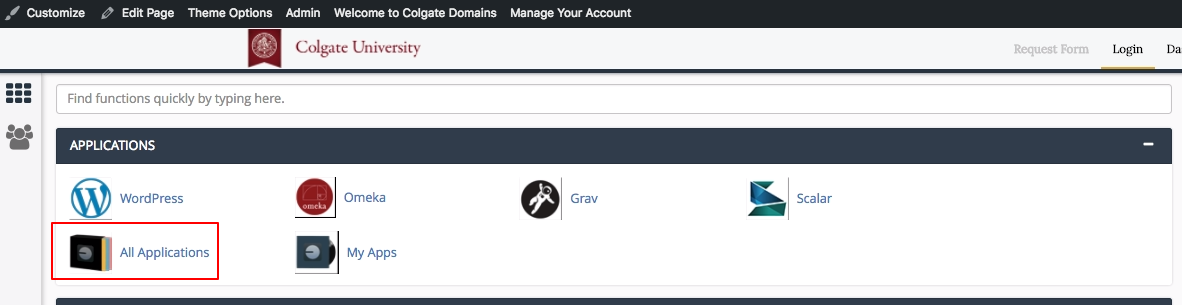
- Find and select MediaWiki.
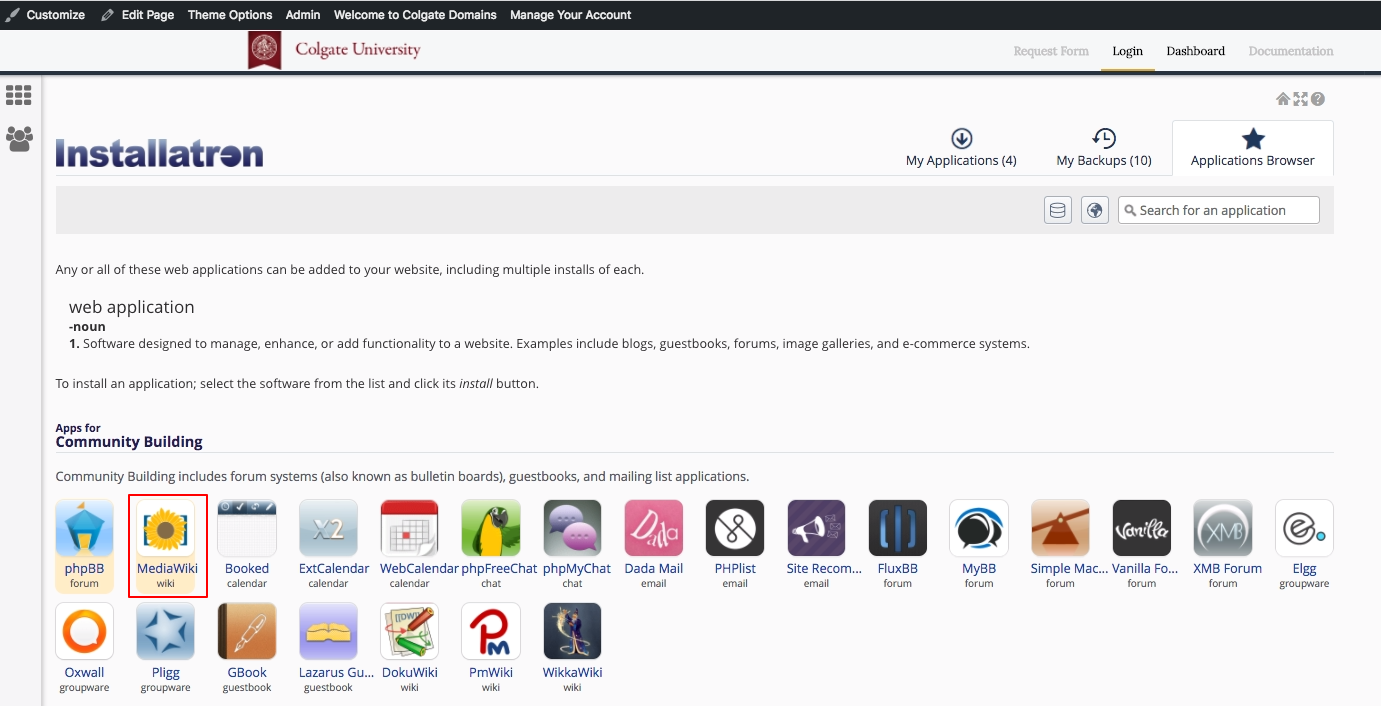
- The next page gives you more information about the MediaWiki software. To begin the install, click install this application in the upper-righthand corner.
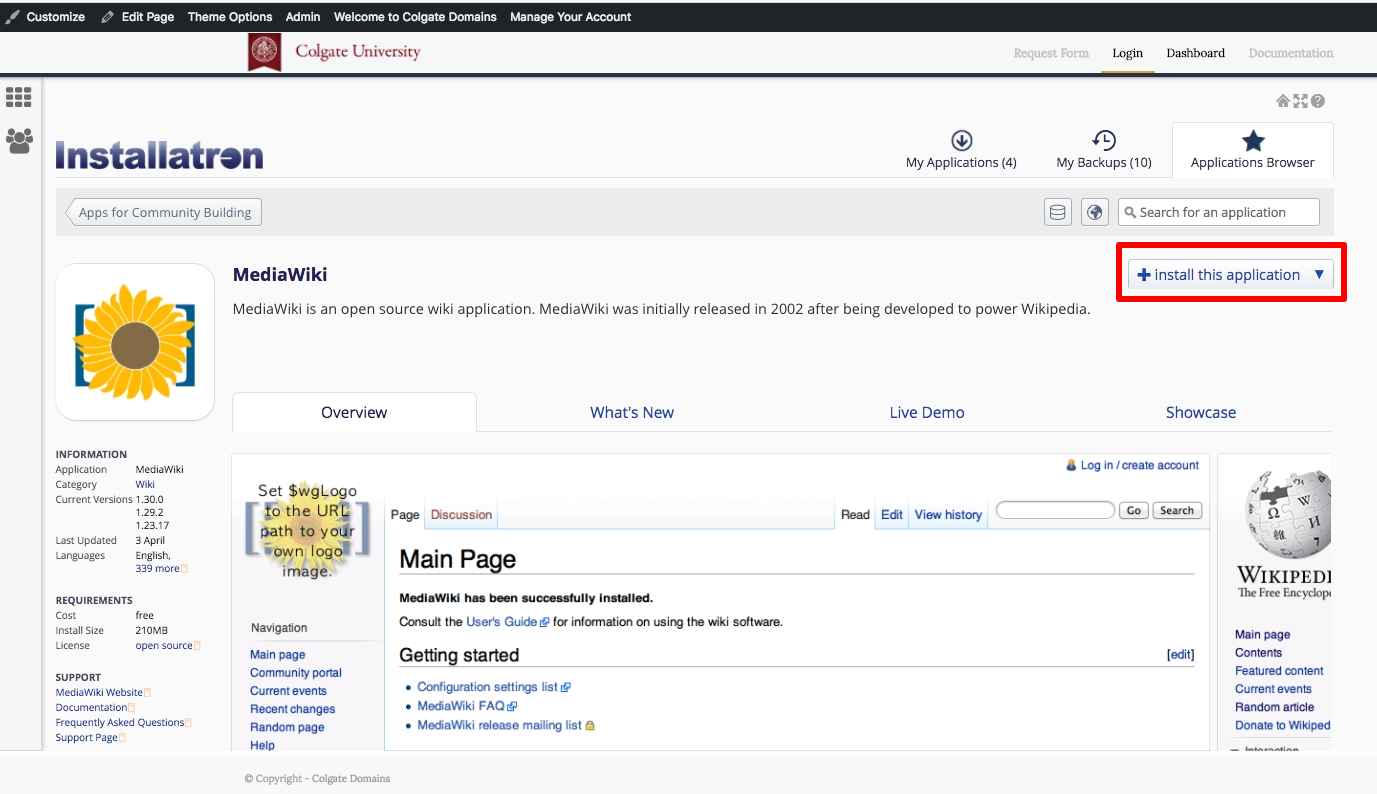
- On the next page, the installer will ask for some information about this install. The first thing you’ll want to do is decide where to install it. If you’re wanting to install MediaWiki on your main (the root) domain, you can leave the directory area empty. If you created a subdomain, you can select it from the dropdown menu. You also have the option of installing MediaWiki in a subfolder by typing in the folder name in the Directory field. Click here for more information about subdomains and subfolders.
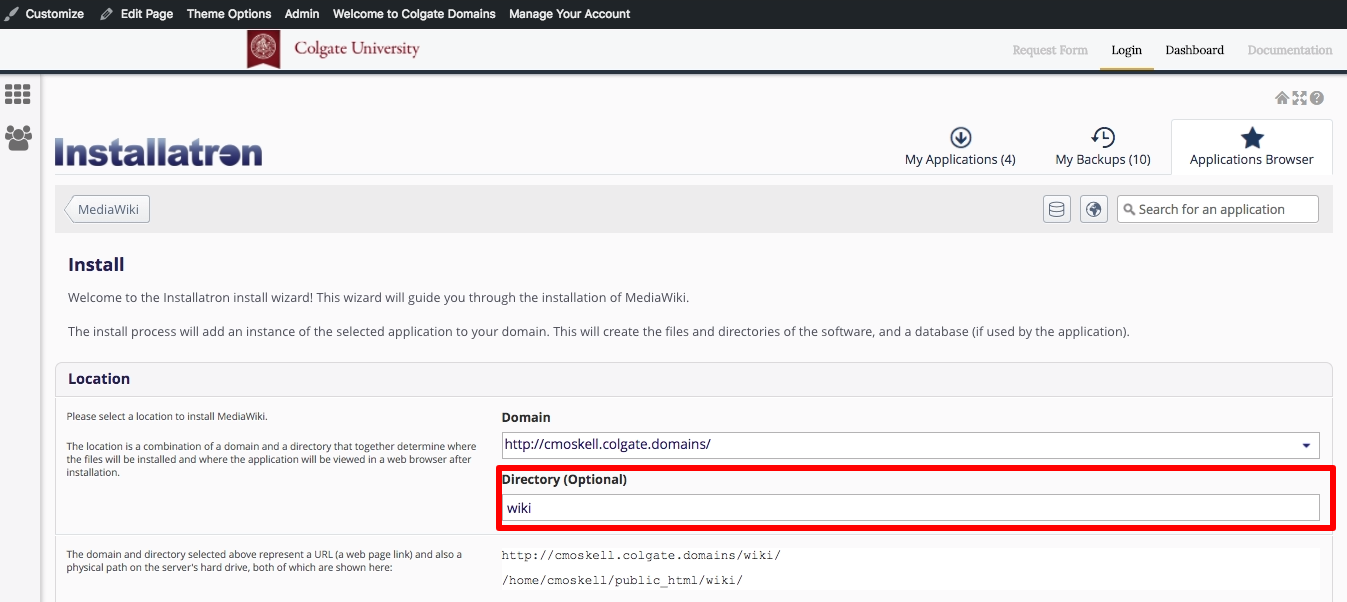
(By default the installer will automatically backup your MediaWiki website and update it anytime a new version comes out. While we recommend you keep this option, it is possible to only do minor updates, or turn them off completely. The installer will also create a database for you automatically, but if you’ve already created one for this website you can choose Let me manage the database settings and enter the details.) - Finally, you’ll need to create an initial username and password for the MediaWiki install. Enter that information in final section and click Install (Note: A default username and password are provided for you.)
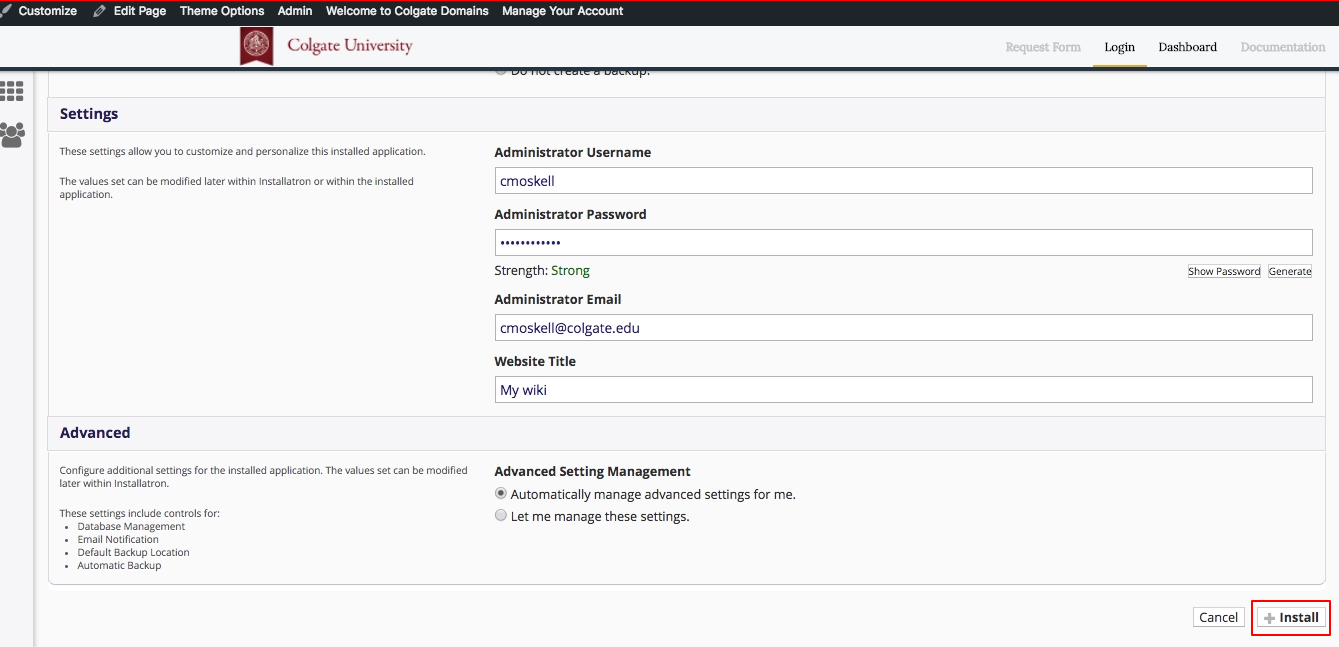
- The installer will take just a few moments to install MediaWiki and a progress bar will keep you updated. When it is complete you will see a link to your new MediaWiki site as well as a link to the back-end administrative section for your MediaWiki site.
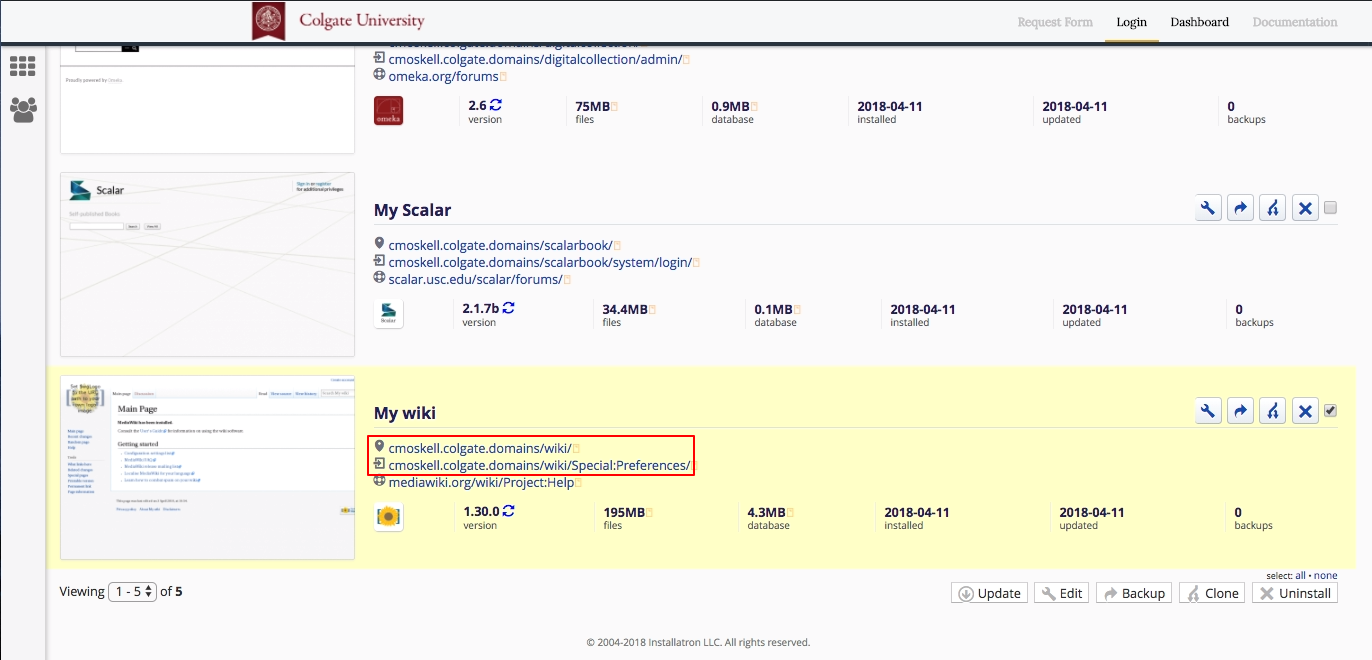
Congratulations, you have now completed the installation of MediaWiki! You can now start to create collaborative documents on your own domain.
Managing Permissions
The default Mediawiki installed has been customized to make it a bit harder for spammers to overwhelm wikis with illegitimate content and comments. This is done by modifying the LocalSettings.php file (a file that is included in every install in which it is possible to provide configurations details).
By default, Mediawiki allows anonymous users to create pages and edit pages in the wiki. The modifications change this in the following ways:
-
Anonymous users cannot edit existing pages
-
Anonymous users cannot create pages
-
Registered users must click the confirmation link in the registration email in order to edit or create pages
This approach should drastically reduce unsolicited content and comments on Mediawiki installations. One further step that administrator might take is to turn registration off after a predetermined amount of time. Users must create accounts by this date; after that, the settings are changed so that registrations are no longer open.
To add this setting, you must edit LocalSettings.php in your Mediawiki install:
- Login to cPanel and browse to your File Manager.
- In the File Manager, browser to the folder within publichtml that contains your Mediawiki install. If you installed the wiki at the root of your domain, you won’t need to go any further than publichtml. If you installed the wiki in a subdomain or subdirectory, you’ll need to find the directory that is associated with that space.
- Locate LocalSettings.php. Download the file to back it up, before editing. Click the Edit icon at the top of the File Manager.

- If you did not back up the file, as suggested in the step above, cancel and do so now. Otherwise, confirm that you want to edit the file.

- Browse to the bottom of the document, and locate the custom settings that were added during the Mediawiki install and the line “$wgGroupPermissions[‘*’][‘createaccount’] = false;”

Using MediaWiki
You can learn how to use this application at the official MediaWiki Help Pages. This support documentation wiki will show you how to manage all aspects of your wiki, including customizing its appearance, editing content, and changing user settings.
5.Acknowledgements
Even though this documentation is openly licensed, we wanted to give thanks to the multiple educational institutions that created and contributed to the documentation for Reclaim Hosting’s “Domain of One’s Own” platform and the applications contained therein: The University of Mary Washington, University of Oklahoma, Emory University, Middlebury University and Colgate University (who’s version we adapted specifically for Colgate Domains).
1.10.Social Media
As you begin to build out your digital presence you’ll probably start to think about social media in some form. In fact it’s likely that you already have at least one, if not more, social media accounts (Facebook being the most popular to date). Everyone uses social media in different ways, and although it’s often interesting to see people break the boundaries of the “social norms” of a specific online community, this article will focus more on the accepted use cases for specific social networks and how they can help you build your digital presence. This is by no means a comprehensive “How To” of Twitter or Facebook, but a good starting guide to think about where you best fit in to these online communities.
Facebook
The majority of folks that will read this likely have a Facebook account. With over 1 billion active users it’s by far one of the more popular social networks. Many treat Facebook as a semi-personal space, one reserved for family and friends to share photos and highlights of what’s happening in their lives. Facebook also supports “Groups” for sharing amongst a smaller set of individuals regularly, and “Pages” which are less personal and more public-facing profiles meant for organizations and businesses. There are plenty of applications that make it easy to publish a link to the work you do on your blog and your participation in other networks back into your Facebook profile. In genera, it’s a good practice and can often lead to interesting conversations with different groups of folks. This practice of publishing elsewhere and then feeding into Facebook is desired over the alternative, using Facebook for all content and then pushing it out to other communities. The main reason for this is that privacy concerns over how different people can view content on Facebook have changed often enough to leave users concerned. There’s also never any certainty of sustainability with any of these social networks (remember MySpace or Friendster?) no matter how popular, so publishing in your own space and then pushing out to others makes a lot of sense. The key takeaway is that Facebook is a great personal network and can also be the starting point for some of these larger professional discussions should you decide to use it that way.
Twitter
While no longer the new kid on the block, Twitter has only relatively recently started to gain momentum. It doesn’t have nearly the same user base as Facebook (though there are about 500 million accounts to date) and the way people use it is very different. Twitter has focused on the short status message from the start, before Facebook even integrated the idea into their platform. Users are limited to 140 characters. It’s a conversational platform for interacting with people. It’s used heavily at conferences and many choose this as a social network for really networking with peers and others in their community as well as people they might not ever meet in real life. You can follow as many people as you want and it’s a great way of having a stream of information about “what’s happening” with people and groups you’re interested in. One powerful development of Twitter is that celebrities have begun to embrace it as a way to speak directly to their fans without having the message interpreted through other media and journalism with a slant. The ability to search various topics or hashtags (keywords) and see a running stream of what people are saying about that topic is also a very powerful way of gauging reaction to ideas and events. It’s a great idea to experiment with a Twitter account by signing up, adding a profile picture and information about yourself, following a group of people, and interacting with it daily. While the gratification may not be immediate, it’s one of those social networks where the more you put into it the more you will get out of it.
LinkedIn
LinkedIn is the professional resumé of social networks. It mixes the ability to keep an updated resume of where you work and what your accomplishments are with a social aspect of having people recommend you and comment on your work. Most users find LinkedIn helpful not as a day-to-day network they use, but rather when they’re searching for a new job and want to find people they know that might have connections. The old saying “It’s who you know” when finding a job or making a connection is particularly relevant here where those connections can be exposed to you (You know this person who works for the company of one of Bill Gate’s sons, and the VP went to high school with you).
Summary
As mentioned in the opening paragraph, talking about social media is an ever-changing and moving target and this article can never be truly comprehensive. The goal of Colgate Domains is to have you thinking more critically about where you put your content, not that you don’t participate in these networks which still have a lot of value, but rather that you own the work you create. Facebook, Twitter, LinkedIn, and others all have different audiences and the more places you push your content to, the more opportunities for discussion and feedback you’ll receive. The ability to network with an increased amount of people that isn’t reliant on face-to-face meetings is a powerful change in how we interact on the web and the value of it. As you begin to explore social media the best recommendation would be to choose a space you want to explore and really dive in. Follow as many people as possible, talk to them, respond to their work, and you’re more likely to get responses in return that start to build that sense of community for you.